Tuesday, December 15, 2009

Best-Ever Banana Bread

I'm serious. This actually is the best banana bread you will ever taste. Whichever minion of Martha's came up with it deserves a nice firm handshake and a cigar. Or something. Anyways, this is the moistest (moistest?) banana bread you will taste. It keeps really well, although I don't think you'll have to worry about that.


Martha's original recipe calls for sour cream - this is the only thing I changed. I don't keep sour cream in the house usually, so I always make this bread with plain yogurt - fat free, even! It always turns out AWESOME. If you have sour cream to get rid of, feel free to use it instead of the yogurt in the recipe below. You can also add 1/2 c chopped nuts in at the end if you feel the urge.

You need:

1/2 c butter, softened, plus some for your loaf pan
1 c white sugar
2 large eggs
1 1/2 c flour
1 tsp baking soda
1 tsp salt
2-3 very very ripe bananas, mashed thoroughly
1/2 c plain yogurt
1 tsp vanilla

1. Preheat your oven to 350ºF and butter a 9×5×3" loaf pan. Preparation is important! :)

2. Cream the butter and sugar until it's light and fluffy, then beat in your eggs. I used my KitchenAid for this; you can use a hand mixer or even your own arms plus wooden spoon!

3. In a different bowl, mix your dry ingredients, except the nuts, if you're using them. Add the dry mixture to the butter mixture and combine gently. Then add your bananas, the yogurt, and the vanilla. After you have mixed all this in, you can add your nuts. Or chocolate chips, for that matter.

4. Pour the batter into the greased loaf pan and bake for about an hour and ten minutes. A toothpick or knife should come out clean when it's done. After it cools in the pan for about 15 minutes, you can cool it on a rack, or just eat it. Warm banana bread is the best - that way if you put butter on it (mmmmm) it gets all melty (see below). :)


Digg Technorati Delicious StumbleUpon Reddit BlinkList Furl Mixx Facebook Google Bookmark Yahoo

Wednesday, December 2, 2009

Beer-drinking Pretzels

Salty, poofy, chewy, and delicious.


These are amazing dipped in mustard. And even better with a nice cold pint.

I found the recipe somewhere on a Fresh Loaf thread somewhere, but the direct link is here. These are super easy, so if you've been reluctant to approach yeast before, here is a good opportunity.


You need:

1 tbs yeast
1 1/4 c warm water
1/4 c brown sugar
4 c flour

coarse salt
melted butter (about 3 tbs)
1/2 c baking soda dissolved in 3 c water at a simmer


1. Dissolve the sugar in the warm water and add the yeast to proof it. The yeast should get foamy after about 5 minutes.

2. Add the flour and mix it gently. The dough should be sticky but well combined. Don't over-knead it or you'll get tough pretzels.

3. Let the dough rise in a covered, oiled bowl for about 20-30 minutes depending on how warm your house is.

4. Divide the dough into 10 equal pieces and shape into long ropes about 1" in diameter. Shape these into pretzel shapes and prepare some greased baking trays. Dip each pretzel into the water-baking soda mixture and submerge for about 20 seconds. Then place each onto the tray.

5. Bake at 450ºF for about 5 minutes or until the pretzels are golden and smell like heaven. Remove from the oven, brush with butter, and sprinkle with coarse salt. TRY to wait as long as you can before chowing down on them, but they are really really good warm.


I also think this would be a fun baking activity to involve kids in if you happen to have any around! Kids are really good at making dough ropes. :) Digg Technorati Delicious StumbleUpon Reddit BlinkList Furl Mixx Facebook Google Bookmark Yahoo

Wednesday, November 25, 2009

Spanish Tortilla


When I was in Spain this summer I ate a lot of tortillas. They were our go-to when we were sick of fish in Cabo de Palos (didn't happen to me, but to other members of my family), when we didn't feel like eating heavy meat in Madrid, or when we wanted something to nosh on between lunch and dinner while drinking a lovely Alhambra beer. And now that winter is rapidly approaching, I think about sunny Spain a lot. Like, a REAL WHOLE LOT.

While I was in Spain I bought a Spanish cookbook, but I hadn't made use of it (other than looking through it and reminiscing) until tonight. A tortilla is a perfect light dinner and it only uses pantry staples so you don't have to go out to buy anything fancy. And, if you're like me, you will get to think about lying on beautiful beaches like this one while eating it:


Here's what you need:

1 kg potatoes (about 7 small ones), thinly (THINLY) sliced (don't bother peeling them)
2 medium onions, thinly sliced
8 eggs (I made mine with 6 but 8 would have been yummier)
plenty of olive oil and salt and pepper.

1. Heat about 4-5 tbs of olive oil in a cast-iron frying pan over medium-high. When the oil is hot but not smoking (that's too hot), throw in your potatoes and brown them for 5 minutes.

2. After 5 minutes, add the onions and reduce the heat. You want to cook the potatoes through without burning them. It might take up to 30 minutes. The potatoes should be soft.

3. Meanwhile, beat your eggs with a whisk. When the potatoes are cooked, let them cook in a strainer for a while (you get rid of a bit of oil that way, too) and then mix them in with the egg. Add a fair bit of salt and pepper.

4. With the cast-iron pan still on low, pour in the egg and potato mixture. There should still be oil coating the pan from when you were cooking the potatoes. Let the tortilla cook SLOWLY. You need to cook it until egg is almost entirely cooked through without the bottom burning. DO NOT STIR THE EGGS but DO curve over the edges of the tortilla with a spatula so that the edges end up rounded.

5. When it is just about cooked through so that there are almost no runny bits on top - now this is a bit tricky - take a place and place it on top of the pan. You are going to flip that tortilla. So, holding the plate steady on the pan with one hand, flip the tortilla out of the pan and onto the plate. Then slide it carefully back into the hot pan but on the other side. Got it?

6. Let the tortilla brown on that side, then slice and serve! You can add variations - zucchini, ham, cheese - but the potato version is classic. It's pretty tasty as cold leftovers too - they serve it cold in Spain.


Digg Technorati Delicious StumbleUpon Reddit BlinkList Furl Mixx Facebook Google Bookmark Yahoo

Sunday, November 15, 2009

Yorkshire Pudding!

oh yeah, and roast beef, too. And gravy, and peas, and roasted carrots, and garlic mashed potatoes. But most importantly, YORKSHIRE PUDDING.


This was my first attempt at this grand and most favourite meal. I did overcook the meat, which I think is a common issue, but it was still so so tasty. I am currently enjoying cold roast beef sandwiches with mustard.

SO: Roast beef. I bought a "French Roast" for $7/kg. I made deep slits in the meat and inserted slivers of garlic into it. I guess I used about four cloves of garlic. I seasoned the outside with salt and pepper, and seared the outside in hot oil in a cast iron pan until the outside was browned.

Then I put it on a rack in a roasting pan surrounded by carrots and onions and tented it with foil. It went in the oven at 350 until my thermometer read 145 - according to everything I've read, that would have been medium-rare, but I guess next time I'll take it out sooner as it was closer to well-done.

While the meat was cooking, I chopped up a bunch of potatoes and threw them in a big pot of water with 6 or 7 whole garlic cloves. When the potatoes were soft, I drained them and mashed the potatoes and the garlic cloves with lots of butter, milk, garlic salt, and some ricotta cheese for creaminess. I kept the potato water to make gravy later.

The Yorkshire pudding recipe I got from Gordon Ramsay via Serious Eats. I had seen Gordon Ramsay lecture people about proper Yorkshire puddings so I figured he was the guy to go to for instructions on this matter.

So I stirred together a cup of flour with 1/2 tsp of salt and added 4 eggs and (in two goes) 1 1/4 c milk. I beat the mixture until it was smooth and then I just let it sit on the counter until it was ready.

About 15 minutes before I thought the roast would be ready, I turned up the temperature of the oven to 450 and poured 1 tsp of canola oil into each hole of a 12-hole muffin tray and preheated the oil in the tray. Then I divided the batter between the muffin holes - it should sizzle in the hot oil when you add it - and then stuck the tray back in the oven until the puddings are brown and puffy. I had taken out the roast by this time, of course.

While the roast is resting and the puddings are baking, you can cook your peas and make your gravy out of the drippings from the roast and your potato water.

Serve the puddings in a basket lined with paper towels, because they are a little greasy. But they are the perfect compliment to a roast dinner and go amazingly well with gravy.

Digg Technorati Delicious StumbleUpon Reddit BlinkList Furl Mixx Facebook Google Bookmark Yahoo

Wednesday, November 11, 2009

Soupe à l'Oignon Gratinée

... also known as French Onion Soup.

I've been making this for years, but kind of according to my own recipe, which was good. But tonight I took a look at Julia Child's, and I have to say she totally kicked my ass. I'm really not surprised though - the woman did write a few cookbooks, after all.


I used to use red wine to fill out the broth. Julia's uses vermouth and brandy - a distinct improvement. However, it did mean that I was stuck with some "superfluous" red wine. On a Wednesday, no less! :)

You need:

5 c thinly sliced yellow onions
3 tbs butter (oh Julia... )
1 tbs oil
1 tsp salt
1/4 tsp sugar
3 tbs flour
2 litres beef stock
1/2 c dry white vermouth or white wine
pepper to taste
3 tbs cognac
rounds of hard-toasted French bread
1.5 c grated Swiss or Parmesan cheese (I used cheddar but Julia says Swiss is best)

1. Melt the butter and oil over low heat (seriously - low) and sautee the onions for 15 minutes. They should get nice and translucent.

2. Raise the heat to moderate and stir in the salt and sugar. Cook for 30-40 minutes until the onions are nice and golden brown. This adds depth to the soup. YUM.

3. Add the flour and cook for 3 minutes. Then add the hot beef stock and vermouth while the pot is off the heat. Then simmer the soup for 40 minutes.

4. Meanwhile, toast your baguette slices. When the soup is done simmering, stir in the cognac (I used brandy).

5. Pour the soup into French Onion Soup bowls (I got mine for 99¢ at the Salvation Army!) or oven-proof individual bowls. Stir a bit of cheese into the soup. Float the toasted bread on top and top with more cheese. Julia says you're also supposed to stir grated raw onion into the soup but I opted not to do this. Still delicious!

6. Bake the soup in a preheated oven at 325º for 20 minutes, then broil for a few minutes until the melted cheese browns.

7. Let the hot soup sit a few minutes and enjoy!


Digg Technorati Delicious StumbleUpon Reddit BlinkList Furl Mixx Facebook Google Bookmark Yahoo

Monday, November 2, 2009

Italian Wedding Soup

You may have noticed that things are getting a little cozier around here - soups, pies, breads - they're going to get cozier, too! Winter is a-comin'! That's where this hearty meatball soup comes in. Usually, Italian wedding soup is made with small pasta, but I decided to use barley instead. It's a bit heartier than pasta and it's what I had on hand! It turned out really nicely - barley added a great texture to the soup.


You need:

1 tbs olive oil
1 medium onion, finely diced
1 stalk of celery, finely diced
1 carrot, finely diced
2/3 c pot barley
8 c chicken stock
3 c fresh baby spinach, roughly chopped
20 home-made or store bought chicken or turkey meatballs

1. First, saute your onion, celery, and carrot in the olive oil. When the onions are translucent, add the stock and the barley and bring to a boil. Leave it at a vigorous simmer for 30 minutes or so - until the barley is cooked.

2. Add the meatballs and the spinach and boil until the meatballs are cooked (if you used fresh/raw) and the spinach is wilted.

Serve with yummy 60-minute dinner rolls: YES they only take 60 minutes!! AND they are fluffy and delicious! It's like magic. :)


I opted for a half recipe so what you see here makes 12 rolls, not 24 as in the original recipe. I'm sure this will work without a kitchenaid, but it's what I have!

You need:

1/4 c. milk
2 tbs sugar
1 tsp salt
1.5 tbs butter
3 1/3 tsp yeast
3/4 c lukewarm water
3 c flour

1. Melt the butter, milk, sugar, and salt in the microwave. Stir to make sure they are all dissolved.

2. In the bowl of your mixer, dissolve the yeast in the warm water. Then add the milk mixture to it and stir.

3. Add the flour a bit at a time, mixing all the while, until all the flour is added. Knead until you get a sticky but cohesive dough ball.

4. Let the dough rise for 15 minutes in an oiled covered bowl.

5. Shape the rolls into 12 portions and place in an oiled baking pan - 9 X 13 worked for me but muffin tins do the trick too. Let rise another 15 minutes.

6. Bake in a preheated oven at 425ºF for 12 minutes. The rolls should be deliciously golden at this point.


Digg Technorati Delicious StumbleUpon Reddit BlinkList Furl Mixx Facebook Google Bookmark Yahoo

Monday, October 26, 2009

Yet another loaf!

My usual, go-to bread is the french loaf, but I like to play around with different breads. My goal is to find a brown bread recipe that is just as soft and cushy as the bought loaves but without all those scary cushy-making chemicals.

I made this 100% whole wheat loaf a while ago, but it wasn't quite right - 100% whole wheat is a little intense for me. But neither was I interested in the 100% white loaf on which it was based. So I came to a delicious compromise:


2 c warm water
2/3 c sugar (yes it is a lot)
1.5 tbs yeast
1.5 tsp salt
1/4 c oil
3 c white flour
1 c oats
1 3/4 c wheat flour
1/4 c vital wheat gluten.

1. In a small bowl, mix water, sugar, and yeast together. Let the yeast foam - about 5 minutes.

2. In a large bowl, or the bowl of your mixer, mix all the flours and the salt and the oats.

3. Add the yeast mixture and the oil to the flour mixture and mix until combined. Then knead it until you get a cohesive dough that is smooth but not tough.

4. Let the dough rise, in a covered, greased bowl, for about an hour - until the dough has doubled.

5. Shape it into 2 loaves and let rest for about 30 minutes, or until the dough rises 1" above the greased loaf pans you put it into.

6. Bake at 350º for 30 minutes. Remember to let it cool before cutting! The gluten is still developing. :)


This loaf is as soft as store-bought but you can pronounce all the ingredients. It's really great for sandwiches and does really well in the toaster. It's slightly sweet tasting, so if you're not into that, you could omit some of the sugar, but if you don't add enough you won't get the squishy texture I was going for.

Digg Technorati Delicious StumbleUpon Reddit BlinkList Furl Mixx Facebook Google Bookmark Yahoo

Monday, October 19, 2009

Chicken Pot Pie

It's the season for savoury pies again! Get excited! Here to inaugurate the season is chicken pot pie.


This can be made really easily with left-over chicken or turkey - it might even be better that way - so it's a tried-and-true way to get rid of thanksgiving leftovers. Also, you can either make your own or buy your own pie crust, or you can buy puff pastry from the freezer of your grocery! Any way you choose to do it, pot pie is delish. :)

You need:

250-280g (or more) chicken/turkey meat (thigh is more flavourful; breast is lower in fat - a mix is nice!)
1 small onion, diced (if you don't use the leek, get a bigger onion)
1 medium leek (optional), diced
2 carrots, diced
3 medium potatoes (yukon gold are yummy!), diced
2 stalks of celery, diced
3 bay leaves
2 tbs butter
about 4 c chicken stock
salt and pepper to taste
1/2 package frozen puff pastry, or enough pie dough to cover the top of a 9 x 13 casserole
2 tbs flour mixed in water

1. Melt the butter in a large stock pot over medium-high heat. If your chicken is raw, cube it and add it now and brown. Add onions, celery, carrot, and leek and saute until the onions are translucent.

2. Add the potatoes, bay leaves, and enough chicken stock to just cover everything (and your left-over chicken, if that's what you decided to use) and boil until the potatoes are just about cooked through. Season with salt and pepper, and thicken with flour if you need it. There should be a nice gravy.

3. Pour the chicken mixture into your baking dish. Roll out the puff pastry according to the package directions and put it on top of the dish; or roll out your pie crust according to your personal whims. :)

4. Bake in a preheated oven at 450ºF for 20 minutes, or until the crust is golden and puffy. Allow the pie to cool for 10 minutes, because otherwise you will burn your mouth.

DIG IN! I hope you have a nice crackling wood fire to curl up to while you dine. :)

Digg Technorati Delicious StumbleUpon Reddit BlinkList Furl Mixx Facebook Google Bookmark Yahoo

Wednesday, October 14, 2009

Pho! A Daring Kitchen Challenge

I had never ever before yesterday, as far as I know, had pho. And yesterday, I made my own! This was, as the title of this post implies, the October challenge for The Daring Kitchen, hosted by Jaden of the Steamy Kitchen.


Here's the challenge recipe:

For the Chicken Pho Broth:
2 tbsp. whole coriander seeds
4 whole cloves
2 whole star anise
2 quarts (2 liters/8 cups/64 fluid ounces) store-bought or homemade chicken stock
1 whole chicken breast (bone in or boneless)
½ onion
1 3-inch (7.5 cm) chunk of ginger, sliced and smashed with side of knife
1 to 2 tbsps. sugar
1 to 2 tbsps. fish sauce

1 lb. (500 grams/16 ounces) dried rice noodles (about ¼ inch/6 mm wide)

Accompaniments:

2 cups (200 grams/7 ounces) bean sprouts, washed and tails pinched off
Fresh cilantro (coriander) tops (leaves and tender stems)
½ cup (50 grams/approx. 2 ounces) shaved red onions
½ lime, cut into 4 wedges
Sriracha chili sauce
Hoisin sauce
Sliced fresh chili peppers of your choice

Directions:

  1. To make the Chicken Pho Broth: heat a frying pan over medium heat. Add the coriander seeds, cloves and star anise and toast until fragrant, about 3-4 minutes. Immediately spoon out the spices to avoid burning.
  2. In a large pot, add all the ingredients (including the toasted spices) and bring to a boil.
  3. Reduce the heat to medium-low and let simmer for 20 minutes, skimming the surface frequently.
  4. Use tongs to remove the chicken breasts and shred the meat with your fingers, discarding the bone if you have used bone-in breasts.
  5. Taste the broth and add more fish sauce or sugar, if needed. Strain the broth and discard the solids.
  6. Prepare the noodles as per directions on the package.
  7. Ladle the broth into bowls. Then divide the shredded chicken breast and the soft noodles evenly into each bowl.
  8. Have the accompaniments spread out on the table. Each person can customize their own bowl with these ingredients.
Toasting the spices and the additional step of charring the ginger, which isn't in these instructions but can be found at Jaden's blog here, really brought out some amazing flavours. The soup was incredibly rich, even though I cheated and used bought-stock rather than my store of home-made.


I was nervous about cooking this because of all the toasting and charring, but actually, the whole thing didn't take very long, and it ended up being yet another recipe from The Daring Kitchen that will make it into the regular rotation. Adding a dollop of hoisin and some sriracha after it was all assembled really made the dish, as did the squeeze of lime juice. I just wish I had a bigger soup bowl! Digg Technorati Delicious StumbleUpon Reddit BlinkList Furl Mixx Facebook Google Bookmark Yahoo

Wednesday, October 7, 2009

Brown Sauce Noodles

This recipe comes from a book I picked up years ago in the $10 bin at a bookstore. It's called Noodle, which is amusing to me, but it has paid for itself many times over in terms of how yummy these recipes are. One of the ones we come back to over and over again is this recipe for Brown Sauce noodles, which the book says is a translation of "Zha jiang mian."


The author of the book makes a silly joke about how the fight over who invented pasta extends now to who invented bolognese sauce, but he's on to something. The taste is anything but Italian, but the comfort and rich flavours are both there.


You need:


4 tbsp ground bean sauce*
1 tbs hoisin sauce
1/2 c chicken stock
1/2 tsp sugar
2 tbs canola oil
5 spring onions, white part, chopped
1 tbs minced garlic
500g ground turkey**
400g fresh Shanghai noodles***
1 cucumber, cut into long matchsticks
2 spring onions, green part, finely sliced****
1 c fresh bean sprouts, blanched

* The recipe actually calls for brown bean sauce, but I've never been able to find it and now I've stopped looking because ground bean sauce is really really delicious.

** The recipe actually calls for pork, but I usually use turkey just because.

*** Shanghai noodles are sold fresh in Asian grocery stores. They are thicker than spaghetti - more like udon but not quite the same.

**** If you don't want to slice the onions, because it is a pain, I assure you that you can still make the dish pretty with chopped green onion and it will taste identical. It's good practice for knife skills, though!


So here's what you do.

1. In a small bowl, mix the sauces, stock, and sugar.

2. Heat the oil in a non-stick pan and fry the spring onion (white parts) and the garlic for 20 seconds. Then add the turkey and stir until it browns. When the meat is cooked, add the sauce mixture and simmer on a lower heat for 5 minutes.

3. Meanwhile, cook your noodles in boiling water for 4-5 minutes. Drain and place in bowls.

4. Spoon sauce over noodles, then add a sheaf of cucumber strips, green onion strips, and bean sprouts. Enjoy!


Digg Technorati Delicious StumbleUpon Reddit BlinkList Furl Mixx Facebook Google Bookmark Yahoo

Wednesday, September 23, 2009

Ginger Tofu Steaks

Yes that's right - tofu. Don't knock it - it's the best flavour absorber out there!

This is my friend Leila's recipe that she handed down to me years ago. It's excellent and I urge you to try it. Not only will you like it a lot, you will also feel very pleased with yourself for eating healthy and yummy things for dinner. Or lunch!

Ginger Tofu Steaks


--

You need:

2 large garlic cloves, minced
1.5" knob of ginger, minced
1/2 tsp red pepper flakes
2 tbs sesame oil
4 tbs brown sugar
3 tbs soy sauce
1 package of firm or silken extra-firm tofu

--

1. In a small bowl, mix together all the ingredients but the tofu.

2. Drain the tofu and slice into 1/2" steaks. Lay them on a rimmed baking sheet and pierce with a fork.

3. Cover with the marinade and leave until you're ready to use, refrigerated - at least 30 minutes but longer is better!

4. Grill in a grill pan or bake at 350ºF for 15 minutes, or until the edges are golden. Basting with the sauce is a good idea.

--

I served this with soba noodles and steamed broccoli and a bit of soy sauce and mirin mixed together for extra sauciness.

Digg Technorati Delicious StumbleUpon Reddit BlinkList Furl Mixx Facebook Google Bookmark Yahoo

Sunday, September 20, 2009

Devil's Food Cake with Salted Caramel Frosting

Before yesterday I had never made any type of caramel at all. This was a serious adventure for me and it turned out really really well! I got a cake at the end of it! :)


No, those are not shards of amber-coloured glass on top - those are shards of delicious crystal-clear caramel! It took me three tries to get it right, but I can now make caramel and I will tell you my story.

So there are three components to this cake. First, the cake itself. Then the salted-caramel frosting. And finally, the caramel shards on top. The cake recipe is from The Better Homes and Gardens Cookbook. I go there for my cake recipes because it is the high-end version of the church-ladies-auxiliary cookbook. When you want a good cake recipe, you trust Aunt Myrtle's Prize-Winning such and so to point you in the right direction.

From page 157 of my version, we read that we need:

3 eggs
2 1/4 c all-purpose flour
1/2 c unsweetend cocoa powder
1 1/2 tsp baking soda
1/4 tsp salt
1/2 c shortening (I used butter and nothing bad happened to me!)
1 3/4 c granulated sugar
1 tsp vanilla extract
1 1/3 c cold water

1. First, take the eggs out of the fridge (duh) and let them come to room temperature for about 30 minutes. The book says this makes them fluff better. While you're waiting, grease and flour 2 round cake pans. I "floured" mine with cocoa powder because this is a chocolate cake.

2. In a medium bowl, stir the flour, cocoa, baking soda, and salt together. In a large mixing bowl, beat the shortening/butter with a hand mixer for about 30 seconds, then add the sugar and vanilla and beat well.

3. Add the eggs one at a time and beat well after each one. Then, add the flour mixture and the water alternately (so a bit at a time) and mix to combine after each addition.

4. Pour the batter into your pans and bake at 350º for about 30 minutes, until a knife comes out clean.

5. LET THE CAKES COOL ALL THE WAY BEFORE REMOVING THEM FROM THE PANS. Otherwise your cake will crumble and crack and you will be sad. When you've removed them from the pans, let them cool even more before frosting them.


OK now for the frosting. In Canada we call this icing. But whatever. I got my recipe from the website Offbeat Eating and so I direct you there for that.The only thing I changed was that I added more salt because it just didn't seem salty enough. But just taste it and judge for yourself. As s/he says, before you add the icing sugar, it should taste very strongly of caramel and be a bit too salty. Remember that the icing sugar will even out the salt flavour. Also, if I made this again (and I will!) I would use coarse salt instead of fine salt, so that each little salty surprise is wrapped up in the surrounding sweet icing. The icing went down very well - people loved it!

OK the last thing is the scariest part: making hard clear caramel. This took me three tries to get right and I just have to say it is a good thing that sugar is cheap. I have a book just on caramel and in that book it says there are two ways to make caramel - the authentic way, and the cheats way. As usual, I prefer the cheats way, and so I dissolved my sugar in a bit of water before heating it.

Here's what you do: First, get a piece of parchment paper and lay it flat on a baking sheet. Get a deep-sided pan that your pot will fit in and fill it half way with ice water. Then, in a cool pot, combine 1 c of sugar, 1/4 tsp lemon juice, and 1/4 c cold water. Make sure the sugar dissolves as much as possible before heating it over medium-high heat. Make sure you have a little pastry brush and a dish of warm water near by.

Bring the sugar mixture to a boil. Don't stir it, but do use the brush to dissolve any crystals of sugar that are clinging to the side of the pot. You do NOT want crystals - your liquid sugar, when it begins to boil, should be clear, not cloudy. If it's cloudy you have crystals and you have to start again.

When the edges of the sugar mixture start to get a little golden, give the pot a swirl to even out the cooking. Watch it so so carefully because you do not want to burn your precious caramel! When it's a medium amber colour, take the pot off the heat and put the bottom of the pot in the pan of ice water to stop it cooking. Working quickly, before the candy has time to harden, take a spoon and drizzle the caramel onto the parchment paper in a swirly pattern to make a beautiful spider-web of caramel, or pour out the candy onto the parchment to be shattered after it cools fully. The candy is really super hot at this point, so even though it looks delicious, if you try and taste it you will burn yourself quite badly and the thing that burned you will be stuck to your finger and/or tongue.

So then what you should do to assemble your cake is first trim the cake rounds so that they are flat on top and not domed. Use a serrated knife to carefully cut off the domed top of the cake. You can eat that part. :) Get out the serving plate you're going to serve the cake on and put a few scraps of parchment paper all around the edges so that they will come about 1" under the edge of the cake when you put it on. Put your first layer on the tray and plop about a third of the icing on it and smooth it out to the edges. Put your second layer on top, making sure the formerly domed and now cut side is down. Ice the sides of the cake with about a third of the icing. The parchment paper makes sure your serving plate doesn't get covered in icing while you're doing this! So clever! Last, use the rest of the icing for the top. You can decorate with the shards or with the spider-web of sugar - it's your call! You can even put some shards in a ziplock and smash them into gold dust and use that. Above all, enjoy!

Digg Technorati Delicious StumbleUpon Reddit BlinkList Furl Mixx Facebook Google Bookmark Yahoo

Wednesday, September 16, 2009

Grilled Lemon Pork Chops

This one is an easy one, but so good.


You need for the main:

two 4oz pork loin chops (or chicken, or turkey, etc.)
1/4 c lemon juice
1/4 c olive oil
1 tsp coarse salt
2 tsp dried oregano
copious fresh ground pepper

On the side:
2 cups of broccoli
a small spaghetti squash


1. The night before (or an hour before you want to eat, but longer is better), put the meat in a shallow dish or a ziplock bag and add the marinade ingredients (lemon juice, oil etc). Just let that sit in the fridge.

2. 40 minutes from when you want to eat, split your spaghetti squash in two lengthwise and clean out the seeds.

3. Arrange skin-side up on a baking tray and put into a preheated 350º oven for 30 minutes.

4. Cut up your broc so it's all ready for when you need it.

5. When your squash has 5 minutes left, preheat your grill. I just got a new grill pan and this was its inaugural use and I am very pleased with its performance!

6. When the grill or pan is hot, toss on your meat. It should sizzle - that way you'll get nice grill marks! At this point it's probably time to remove your squash and turn on the broc to steam. You can let the squash cool on the counter for a little while.

7. When you have nice grill marks on one side of the meat (this should only take 4 minutes or so), flip it and do the other side. When the other side is done, so should the meat be, but if you're cooking with pork you should just make a little cut and check: no pink for pig!

8. Cut up your squash, plate your dinner, and you're good to go! Easy!

Note: One spaghetti squash is a lot for two people. Unless you're cooking for more, you'll have leftovers. But fear not! You can freeze the flesh! Just take it off the skin, put it in a baggie and you're good to go. :) Digg Technorati Delicious StumbleUpon Reddit BlinkList Furl Mixx Facebook Google Bookmark Yahoo

Monday, September 14, 2009

Dosas with Chickpea Filling and Coconut Sauce


This recipe was my first assignment in the Daring Cook's Challenge. Every month, a challenge is assigned and cooks and food bloggers all try their hands at what might be something completely new and unfamiliar.

This month, the challenge, assigned by Debyi of The Healthy Vegan Kitchen, was a wonderful vegan Indian dish composed of spelt flour pancakes (dosas), a chickpea curry, and a coconut and tomato sauce to finish. I admit that I grumbled about having to go out and buy soy milk, but the meal was delicious and will definitely become one of my go-to special dinners.


The amounts here will feed at least five hungry people (we were only three and have enough left over for lunch and dinner for two!), but the chickpea filling freezes well and the dosas are actually quite easy to make, so a little extra wouldn't go amiss.

First, for the Chickpea Filling, you need:

5 cloves garlic, crushed and minced.
1 medium onion, peeled and finely diced
1 largish carrot, peeled and finely diced
1 green pepper, finely diced (red, yellow or orange are fine too)
2 medium hot banana chilies, minced (I couldn't find any hot peppers so I omitted them. Still yum.)
2 TBSP ground cumin
1 TBSP dried oregano
1 TBSP coarse sea salt (remember that if you use fine, you should use less!)
1 TBSP turmeric
4 cups cooked or canned chick peas (about 2 cans)
½ cup (one small can) tomato paste


1.Heat 1 TBS canola oil in a large saucepan over medium to low heat. Saute the onion and the spices with the carrot until the onions are softened. Then add the garlic and peppers and continue to cook until soft, stirring occasionally.

2.Mash the chickpeas by hand, with a hand blender like I did, or in a food processor. They don't have to be completely mashed - I left a bunch (maybe a third) whole to make a better texture.

Add the chickpeas and tomato paste to the saucepan, stirring until heated through. At this point mine was a bit dry, so I added about 3/4 c water - you may wish to do this also.


Second, make your coconut sauce:

1 onion, peeled and finely diced
2 cloves garlic, smashed and minced
½ ground cumin
¾ tsp coarse sea salt
3 TBSP curry powder (mild or hot - whatever you like!)
3 TBSP spelt flour (you can use whole wheat flour if you can't find spelt)
3 cups vegetable broth (you can use chicken if you don't mind it no longer being vegan!)
2 cups coconut milk
3 large tomatoes, diced

1. Heat a little oil in a large saucepan over medium heat. Add the onion and garlic, cooking for 5 minutes, or until soft.

2. Add the spices, cooking for 1 minute more. Add the flour and cook for 1 additional minute.

3. Gradually stir in the vegetable broth to prevent lumps. Once the flour has been incorporated, add the coconut milk and tomatoes, stirring occasionally.

4. Let it simmer for half an hour.


At this point, you are ready to start your pancakes. For the Dosas, you need:

1 cup spelt flour (or whole wheat, or gluten free)
½ tsp regular salt
½ tsp baking powder
½ tsp curry powder
½ cup soy milk (or almond, or rice, etc.)
¾ cup water
cooking spray, if needed (I needed.)

1. Combine the dry ingredients in a bowl. Slowly add the soy milk and water, whisking until smooth.

2.Heat a nonstick skillet over medium heat. Spray your pan with a thin layer of cooking spray, if needed. It's important that the pan is hot enough - you will end up with sad pancakes if your pan is not hot. We had a few sad pancakes, but they were eaten anyways, so I guess they weren't that sad! :)


3.Ladle 2 tablespoons of batter into the center of your pan in a circular motion until it is a thin, round pancake. (If you have made crepes before, it is the same technique.) When bubbles appear on the surface and it no longer looks wet, flip it over and cook for a few seconds. Remove from heat and repeat with remaining batter. Makes 8 pancakes. (We ended up with about 12 pancakes, but they were on the smaller side.)


I arranged the pancakes on a plate and served the chickpeas and the coconut sauce separately so that people could assemble their own. The basic idea is that the chickpea filling goes inside the dosa like a burrito, and then the sauce either can go on top, enchilada style, or inside before you wrap it up. You could even dip, I suppose. Either way, this was a popular dinner in my house and I am very excited to have expanded my cooking skills! Look for another Daring Cook post next month at this time!

Digg Technorati Delicious StumbleUpon Reddit BlinkList Furl Mixx Facebook Google Bookmark Yahoo

Wednesday, September 9, 2009

Back!

Hello, dear readers!

I have returned from my travels and I have a recipe for you. I have a food-review to post shortly about all the delicious (and sometimes surprising) things I ate, but I'm still working on it.

For now, inspired by the Spanish tortillas I ate while in Spain, I have concocted a lunch or breakfast recipe that makes packing a lunch or grabbing something to eat in the morning pretty easy. You could easily make amendments to this recipe to include other types of cheese, sliced ham, red peppers, etc, or the traditional potato found in Spanish tortillas, so if you have success with variations, let me know! :)

Mini Tortillas con Queso (and Spinach) (Makes 12)


You need:

6 eggs
3 tbs chopped chives (or green onions)
1.5 c chopped baby spinach (or arugula)
3 oz sharp cheese, like cheddar, parmesan, or gruyere, grated.
2/3 c dairy - i used 10% cream but you could use milk or yogurt or something else.
a 12-cup muffin tin
cooking spray

1. Preheat your oven to 400ºF and spray the muffin tin with cooking spray, or grease it with butter. You could put muffin liners in, but I don't know how well the egg would come off the paper.

2. With a whisk or a hand mixer, beat the eggs with the milk/cream until foamy.

3. Stir in the chives and spinach.

4. Using a 1/4c measuring cup, fill each muffin cup with the egg mixture.

5. Divide grated cheese among the cups and bake 15-20 minutes, until puffy and golden brown on top.


Mine deflated a lot after I took them out of the oven, but they're still really tasty!

These tortillas freeze really well, too. I just packed all of mine up in individual ziplocks and put them all in a big freezer bag. Just pop it in the toaster oven to warm it up the morning of, or at work/school if you have access a toaster oven. I imagine the microwave would work out OK too, but they might get a bit rubbery.

Digg Technorati Delicious StumbleUpon Reddit BlinkList Furl Mixx Facebook Google Bookmark Yahoo

Friday, July 31, 2009

Hiatus

Hello, dear readers!

Please, don't be alarmed: I will be away for a month.

I'm taking a trip with my family to Paris and Madrid, and while we will be eating lots of yummy food, I won't be cooking much of it! I may get a chance to post some photos of things we're eating. For now, here's a photo from my last visit to Paris - a bakery had made baguettes in the shape of the Eiffel Tower!! :)


So please enjoy your August and I'll see you back in September! If any of you have any must-eat advice for Madrid (or Paris, although we may have our dinners planned out) drop me a line!

Digg Technorati Delicious StumbleUpon Reddit BlinkList Furl Mixx Facebook Google Bookmark Yahoo

Saturday, July 25, 2009

Rainbow Stuffed Peppers


How beautiful are peppers? So succulent, and perfect for the summer - and available in a rainbow of colours! These stuffed peppers are a great light supper - I think you'll like them. I made them with turkey and brown rice, so they're also pretty healthy - you don't have to tell anyone that, though - they'd never guess.

You need:

1 lb lean ground turkey
1 tbs olive oil
1 c uncooked brown rice + enough stock to cook the rice in - I used chicken stock.
4 peppers of any colour you like
1/2 a large onion, finely diced
1 stalk of celery, finely diced
1/4 c finely minced herbs - I used basil, rosemary, and chives because that's what's growing in my garden
1 medium tomato, chopped
2 tbs tomato sauce
6 tbs finely grated parmesan cheese.

1. Start by cooking your rice according to the directions. Instead of water, use stock to cook the rice - it'll give you a better flavour.

2. While the rice is cooking, sautee the onion, celery, and turkey in the olive oil.

3. Slice the peppers in half lengthwise and clean out, leaving the stems intact. You can fit more filling in if you leave them.

4. When the rice is cooked, mix it with the celery-onion-turkey mixture along with the tomatoes, the tomato sauce, and the fresh herbs.

5. Fill the peppers with the rice mixture and place the peppers into a rimmed baking dish or casserole dish. Top with 1 tbs of parmesan each. Carefully pour 1/4 c water into the casserole dish, being careful not to get the insides of the peppers wet.

6. Bake in an oven which has been preheated to 375ºF for 40 minutes, or until the peppers are soft and the cheese has browned. Let rest 5 minutes, then serve!


Digg Technorati Delicious StumbleUpon Reddit BlinkList Furl Mixx Facebook Google Bookmark Yahoo

Monday, July 20, 2009

Sun-Dried Tomato Cream Sauce

This was kind of an experiment. I didn't want to leave the house to shop, but I still wanted a delicious dinner. Armed with pantry ingredients, I ended up creating a pretty darn tasty sauce to serve over pasta.


You need (for 4 servings):

8 oz pasta of your choice (I used penne)
8 sun-dried tomatoes (not in oil - dry)
3 tbs olive oil
3 cloves of garlic
1 large chicken breast (mine was 12 oz)
1/4 c shredded basil leaves
freshly ground pepper
1 c water or chicken stock, divided
3 tbs cream cheese (optional)
freshly snipped chives (optional but lovely)

1. Soak the sun-dried tomatoes in 1/2 c water for about 30 minutes, or until they are soft.

2. Drain the tomatoes, reserving the soaking water. Place the tomatoes and the garlic and 1 tbs of olive oil (and a tbs of the soaking water if you need it) in a food processor and process until almost smooth (some chunks are good and tasty!).

3. In a large cast-iron skillet, heat 2 tbs olive oil over medium heat. When the pan is hot, brown the chicken on both sides and set aside. Pour the soaking water from the tomatoes into the pan and scrape up the browned bits on the bottom of the pan. Let simmer while you slice up your browned chicken breast into bite-sized slices. This would be a good time to start boiling your pasta water.

4. Return the chicken to the pan along with the tomato puree. Allow the chicken to cook through with the tomatoes. This would be a good time to cook your pasta. When the past is almost done lower the heat and add the cream cheese, if using, and the chives, pepper to taste, and the basil.


5. When the cream cheese has mixed in and your pasta is cooked, drain the pasta and toss it with the sauce. If it is too thick, add some liquid until you get the consistency you like. Pasta water is good for this, or stock. Serve with a sprig of basil on top, if you like!


Digg Technorati Delicious StumbleUpon Reddit BlinkList Furl Mixx Facebook Google Bookmark Yahoo

Saturday, July 18, 2009

Muttar Paneer and Dal

I've been a little Cast-Iron Dormant of late - sorry about that. I won't bore you with excuses. Instead, accept this humble offering - three new recipes and accompanying pictures.

I've been wanting to make a nice dal in the crock pot for a while now, and finally decided today was the day to do it. But I decided I couldn't just have dal for dinner all by itself - that would be silly. Clearly I needed another curry to go along with it. And probably some naan bread, too. And so we called some folks and I made a vegetarian Indian feast - we had not only dal, but also muttar paneer, and naan bread.

The most fun part of today, the really new thing for me, was learning how to make paneer. I always try to order some paneer (or at least steal a bite of someone else's) when we go out for Indian, and I just assumed it was one of those really complicated things to make - that I'd have to buy rennet or a cow or something. Actually, it's pretty easy.

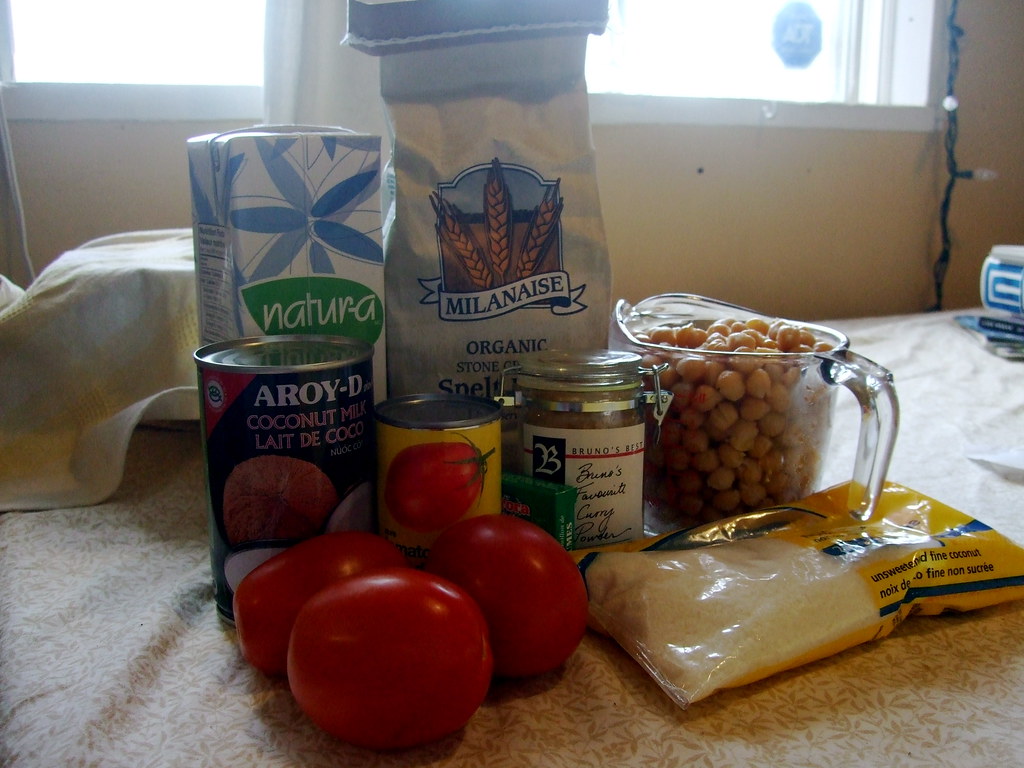
So here are the recipes, if you'd like to follow along. First, crock pot dal, as it's the one you need to start earliest (unless you don't use a crock pot to make it). It makes enough for dinner for four plus lots of leftovers, so if you have a smaller crock pot, feel free to halve the amounts.

You need:


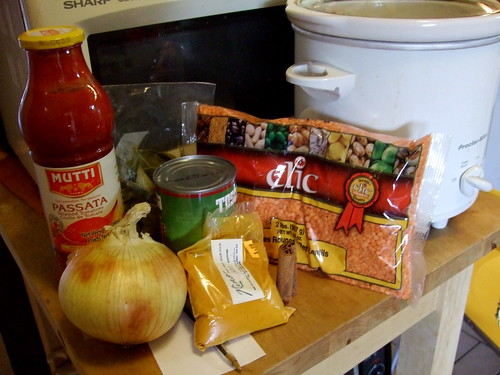
3 c dry red lentils, rinsed and sorted
1 large onion, diced
2 cloves of garlic, minced
1 large knob of ginger, minced
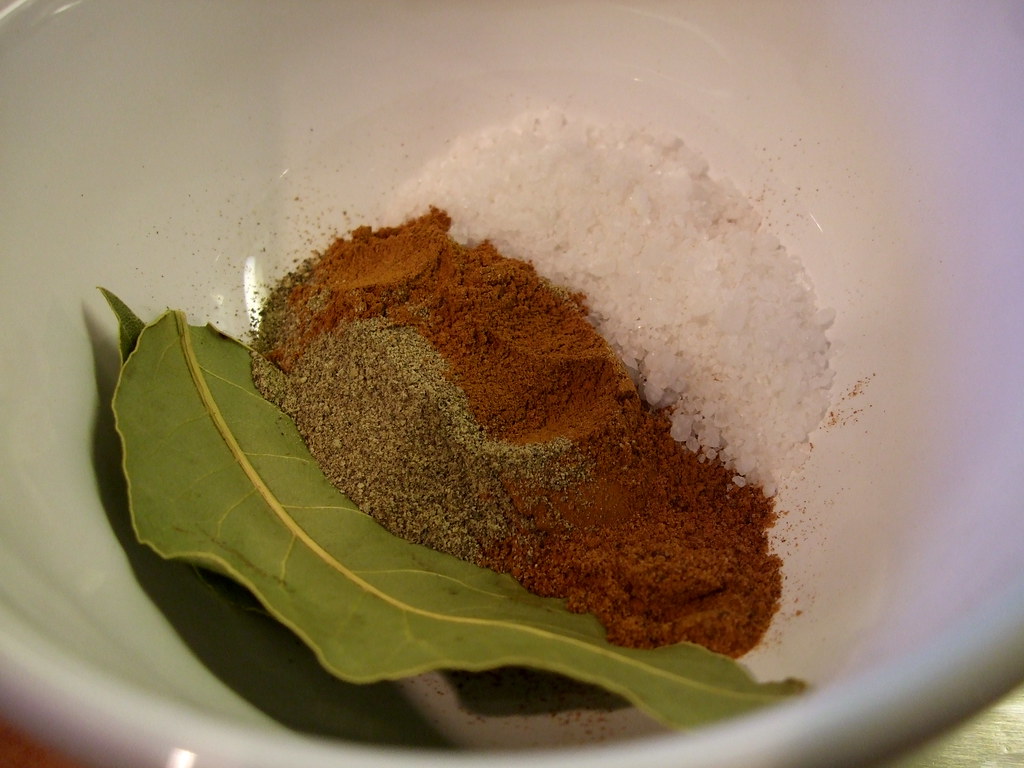
1 bay leaf
1.5 tbs cumin
2 tsp cinnamon + 1 cinnamon stick
1 can coconut milk
1 c crushed tomatoes
3-4 c veggie or chicken stock
1.5 tbs garam masala
1 tbs tumeric
1 c plain yogurt, to add at the end if you want. We didn't but it would be good.

Just put everything except the yogurt in the crock, give it a stir, and turn it on low for about 6 hours, or until the lentils are cooked and everything smells nice. Easy. This one doesn't look so pretty when it's cooked, so no photos.

Next, making your own paneer. Paneer is a very mild and delicious non-melty Indian cheese. It kind of has the consistency of tofu, but not the flavour, which instead is mildly creamy. It only has two ingredients:


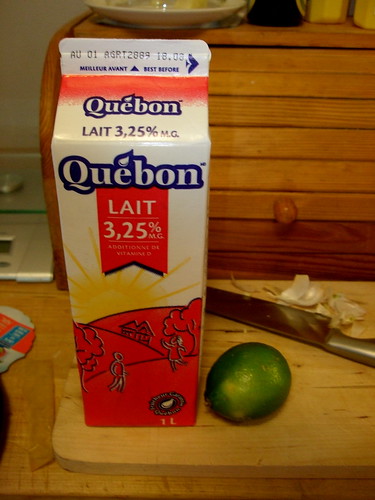
1 litre of whole milk
juice of 1 lime

You'll need to have some cheesecloth handy to make this, or a very fine seive. I found lots of great tutorials for how to make this online - this was the one I ended up following - very helpful, and lovely photos!

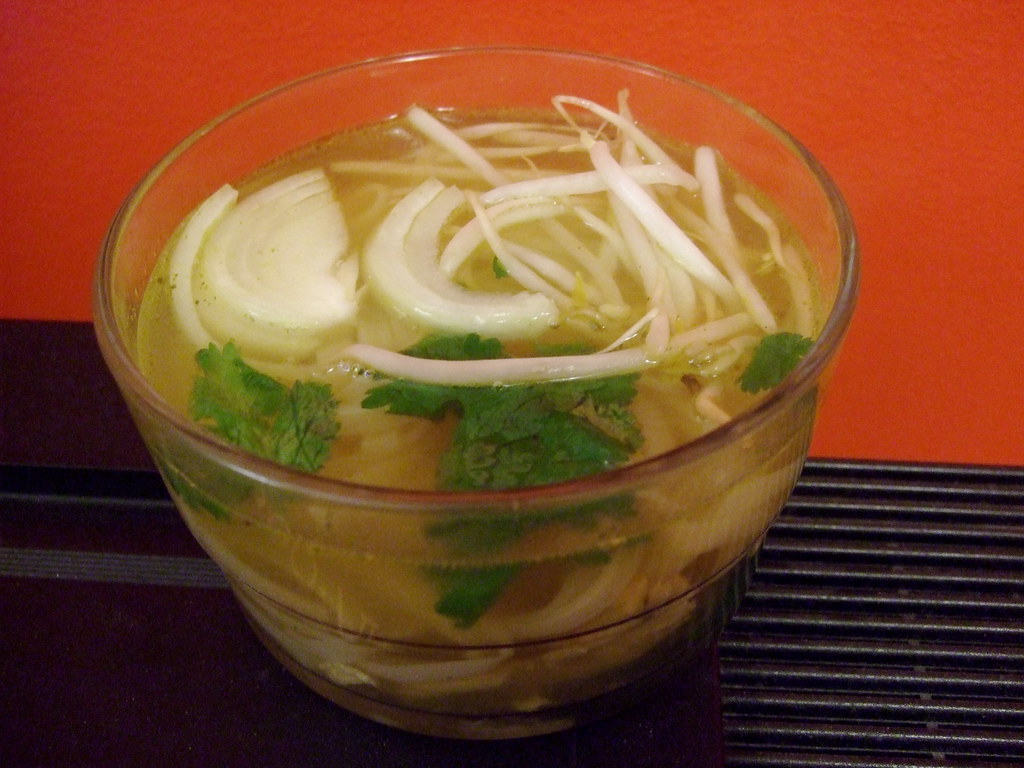
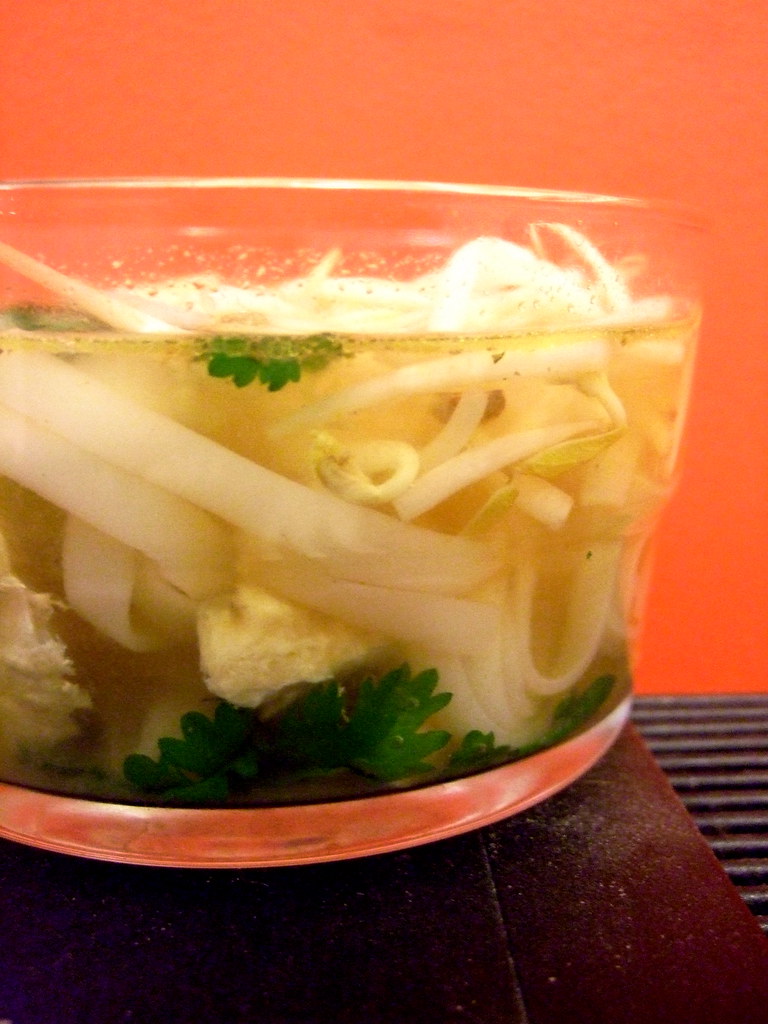
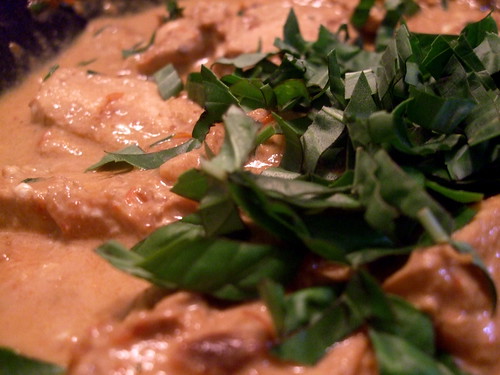
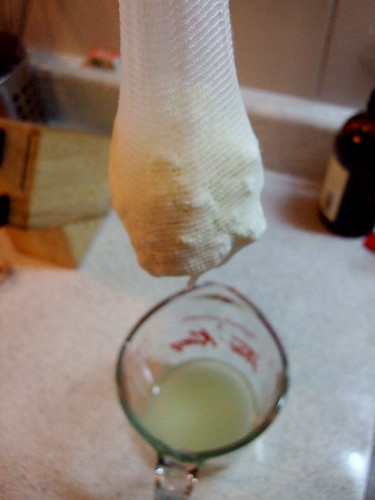
1. Bring the milk to a boil - a full boil. When it is boiling, add the lime juice and stir. The curds will separate from the whey, as you can see in this astonishingly unappetizing photo:


2. Using a slotted spoon, remove the curds and place in the cheesecloth bag to drain. You'll need to drain it for an hour or two. For the first hour I hung mine from a knob, letting the whey drain into a measuring cup below.


For the second hour I pressed it between a rack and a heavy casserole dish to make a firm cheese suitable for cutting and frying.


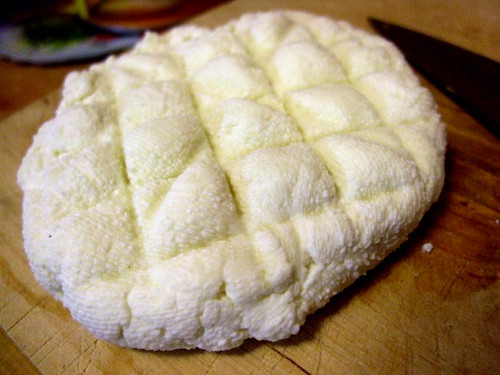
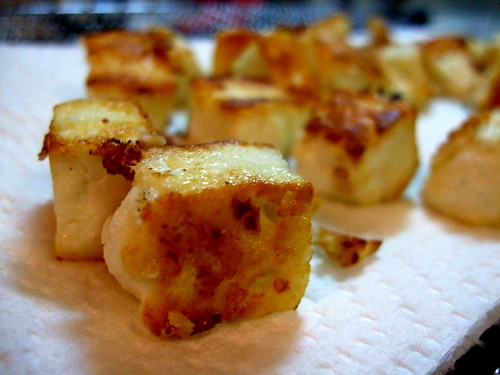
3. When the cheese is firm, remove the bag and cut it into little cubes. It's now ready to use.


My favourite ways to eat paneer are in saag paneer (with spinach) or in muttar paneer (with peas). Tonight was a peas night. I turned to Nigella for help.

You need:

20 oz (by weight) of frozen peas
your paneer that you just made
some oil for frying
1 onion, very finely diced
1 knob ginger, very finely diced
3 cloves of garlic, very finely diced
1/4 c crushed tomatoes or PLAIN tomato sauce
1.5 c veggie or chicken stock
2 tsp tumeric
2 tsp garam masala

1. Fry your paneer. Heat up a pan with some oil and then add the cubed paneer. Let it get brown on all sides, then remove it to a dish lined with paper towel to drain. They should look AMAZING. Resist popping them into your mouth like popcorn.


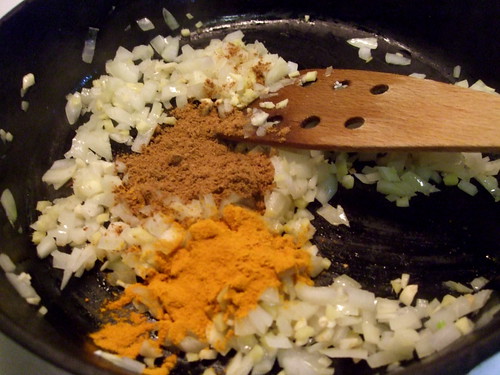
2. In the remaining oil, gently fry the onion, ginger, and garlic. Add the spices and fry again for a minute.


3. Add the frozen peas, the stock, and the tomato. Cover, and let simmer until the peas are soft.

4. Stir in the paneer pieces and heat through.


Serve with naan bread to your happy guests.

Digg Technorati Delicious StumbleUpon Reddit BlinkList Furl Mixx Facebook Google Bookmark Yahoo

Friday, July 3, 2009

Mom's Amazing Seed Loaf

My mom (hi Mom!) sent me this recipe for the most delicious (and healthy!) bread. It's basically a white loaf except for the hefty dose of Red River Cereal, which adds a nice big dose of fiber to every slice. I only made one modification, which was to add some lemon juice. It was an experiment that paid off, as I'd heard that lemon juice is an excellent dough conditioner, and yields a fluffier, tastier loaf.


You can shape it either in loaf tins or freestyle, as I did. The inside crumb is light and soft, despite being so good for you. This might be an excellent bread to use to introduce a reluctant seedy-bread eater to the fold.


You need:

6 c all-purpose flour
2 c Red River cereal (I imagine Sunny Boy would also work)
3 c boiling water
1 tbs sugar or honey
1 tbs salt
4.5 tsp yeast
3 tbs lemon juice
2 tbs butter, for brushing on after.

1. In a large mixing bowl, combine the cereal and the boiling water. Let sit 20 minutes, until the cereal has cooled and absorbed much of the water.

2. Add 2 cups of flour and mix, then add the sugar, salt, yeast, and lemon juice. Make sure the mixture is not hot (warm is ok) otherwise it'll kill your yeasty-beasties.

3. Add the remaining flour 1/2 cup at a time and knead for 10 minutes.

4. Place the dough in a greased bowl and cover. Let rise about 45 minutes.

5. Shape into two loaves and let rise again for 40 minutes. If you shape them freestyle, slash them with a sharp knife just before baking.

6. Bake for 35 minutes at 400ºF. When done, remove and brush with the butter. Your house will smell like heaven.


Edit: Here is a shot of the crumb:


Digg Technorati Delicious StumbleUpon Reddit BlinkList Furl Mixx Facebook Google Bookmark Yahoo

Thursday, July 2, 2009

Pastitsio!

Pastitsio happens to be my oldest sister's favourite meal - with good reason: it's delicious! It's a Greek layered pasta dish made with meat sauce and Bechamel.The spicing of the meat distinguishes it from an Italian-style meat sauce and compliments the Bechamel.


This recipe is from an old Martha Stewart Living magazine - 2001, to be exact. It calls for ground lamb, which is so yummy if you can afford it, but if you can't, ground beef or turkey would do the trick - even veggie ground round might do it!

The recipe is found here, or you can read below; I've modified it only slightly, as I tend to like more spices than recipes tend to call for.


For the meat sauce:

2 tablespoons extra-virgin olive oil
2 white onions, cut into 1/4-inch dice
2 pounds ground lamb (or beef/turkey)
2 teaspoons coarse salt
3 teaspoons ground cinnamon
1/2 teaspoon freshly ground pepper
1/3 teaspoon ground nutmeg
1/2 cup dry red wine
1 can (6 ounces) tomato paste
2 dried bay leaves
2 cups beef stock

For the Bechamel:

6 tablespoons unsalted butter
1/2 cup plus 1 tablespoon all-purpose flour
2 teaspoons baking powder
3 cups whole milk
1 cup freshly grated Parmesan cheese
2 teaspoons coarse salt
1/4 teaspoon freshly ground black pepper
1/4 teaspoon ground nutmeg
1 pinch ground cayenne pepper

To assemble the dish:
butter for the baking dish, or cooking spray
1 pound cooked noodles, like Penne, Cavatappi, Rigatoni, or Ziti.

How to make it all work:
1. Make the meat sauce first. Saute the onions in olive oil over medium eat. Add the meat and the spices and cook until browned. Add the wine and cook until reduced, then add the tomato paste, the bay leaves, and the 2 cups of water. Simmer for 30 minutes and then cover and remove from heat. The smell of the cinnamon and nutmeg mixing with the onions and meat makes your whole house smell amazing! It is very difficult to not eat the sauce without waiting for the dish to be finished.


2. Next make the bechamel. Melt the butter over medium heat until it bubbles, and then add the flour and baking powder. Cook, stirring with a whisk, for about a minute. If it's lumpy at this stage, not to worry. When you whisk in the milk in the next step it'll smooth out nicely.


While still whisking, add the milk slowly. Whisk constantly until the sauce bubbles and thickens. Remove from heat, stir in the cheese and spices, and set aside, covered.


3. Now, preheat your oven to 375º and assemble your dish. Grease your baking dish (9-by-13 works well) with the butter or spray. Cook your pasta, if you haven't already done so - don't cook it as long as you would if you were eating it right away - very al dente is best. Drain the noodles and add them to the meat sauce; stir to combine. Pour the meat and pasta into the baking dish.


Then spread the Bechamel over top. Sprinkle with a bit more parmesan, if you have it, and bake until the top is golden, about 30-40 minutes. Let the dish settle for 10 minutes before you serve it.


Even my very picky nephews asked for seconds!


Digg Technorati Delicious StumbleUpon Reddit BlinkList Furl Mixx Facebook Google Bookmark Yahoo