Monday, April 27, 2009

Spaghetti Aglio E Olio

E red peppers e chives...


If you plan on kissing, make sure your kiss-ee eats this too. It's for garlic lovers!

You need (serves 2):

1/8 tsp red paper flakes
8 cloves of garlic, thinly sliced
4 tbs olive oil
spaghetti for 2
2 tbs minced chives or 2 tbs chopped fresh flat-leaf parsley
1/3 of a red pepper that needed to get used up (optional but yummy)

1. Heat the oil on very low in a large cast-iron skillet (big enough to toss the pasta in later). Add the garlic and let it cook.

2. Meanwhile boil your water with lots of salt. When it's boiling, add your pasta.

3. Pour yourself a glass of wine and chop up your chives and/or parsley and/or peppers.

4. Wait for the garlic to get a bit brown on the edges. Hopefully this will correspond with your pasta being almost done. At this point, toss in your peppers and parsley/parsley substitute and the red pepper flakes.


5. When your pasta is done to your liking, drain it and toss with the oil etc. Add salt and pepper to taste and enjoy!

Digg Technorati Delicious StumbleUpon Reddit BlinkList Furl Mixx Facebook Google Bookmark Yahoo

Sunday, April 26, 2009

Roasted Asparagus with Poached Eggs

My memories of poached eggs are from when I was little and hated egg whites. I only liked the yolk, and I liked it runny. Perfection for me as a five year old was a mug full of cut up, buttered toast and a runny poached egg.

I am still convinced that the perfect proportion of yolk to white lies in the poached egg, where the distribution of the white is such that it minimizes its interference with the golden, buttery yolk. Many days I eat poached eggs on toast for breakfast, but sometimes I want something a little more mature, a little more sophisticated. Enter this meal:


You need:

1 bunch of asparagus (yay! It's asparagus season!)
2 tbs olive oil
2 tbs parmesan cheese (optional but delicious)
2 eggs

1. Heat your oven to 400ºF with the rack in the middle. Line a baking pan with foil to make clean-up easy. Trim your asparagus by bending each spear until it snaps - that way you don't get any woody bits.

2. Put your asparagus in the baking pan and drizzle with the olive oil, tossing to coat. Sprinkle the cheese on top, if you're using it. If you're not, I'd sprinkle a bit of coarse sea salt on top.


3. Put the pan in the oven. Start a small pot of water on to boil. Poaching eggs works best if you have the water deep enough that the egg doesn't just sit on the bottom. The pot should be wide enough that you can swirl the water and eggs around with a bit of room to spare.

4. After about 12 minutes, the asparagus will be done. So before that point, after about 7 minutes and when your water is boiling, turn the pot down to medium high, swirl the water with a spoon so that it swirls in a circle, and break your eggs into this swirling, boiling water. The swirling makes sure that the whites wrap around the yolk, giving it that perfect ratio we discussed earlier.

5. Check on your asparagus. It may be done, and by done I mean roasty-toasty. You can take them out when they look fully cooked and the cheese is golden. At this point, check your eggs. I am never sure how long it takes for a poached egg to cook. I hover over the stove and lift it out after the white becomes opaque to poke it and see how it's doing. When the white is firm but before the yolk hardens, I pull it out. Remember that the egg will keep cooking for a bit after it's out of the water, so don't wait too long!

6. Arrange your asparagus on a plate and top with the eggs. Generously salt and pepper your plate and dig in! You might want to have a piece of toast standing by to mop up all that delicious yolk.


I had this for lunch, but I think it would be lovely for a quiet dinner on a weeknight, or in a smaller portion, it would work really well as a starter if you were having a fancy dinner party.

Digg Technorati Delicious StumbleUpon Reddit BlinkList Furl Mixx Facebook Google Bookmark Yahoo

Tuesday, April 21, 2009

Montreal-Style Bagels

I promised Annalise over at Knead to be Loaved a "bagel-off" when she posted her bagel recipe a while ago. Well, the fight is on! ;)

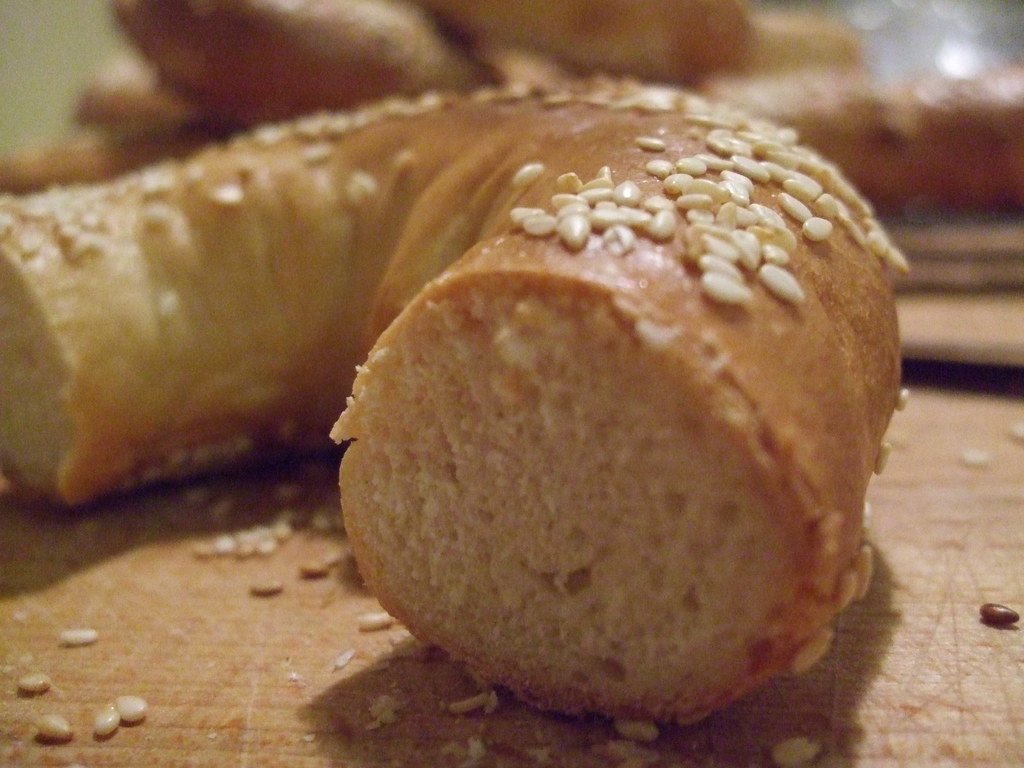
There are lots of bagel recipes floating around, but once you've tasted a fresh, warm bagel from Fairmount Bagels, none of those big, bready, more-dough-than-hole impostors will do. A real bagel should be dense and chewy! If your bagel has the texture of round bread with a hole in it, well, I'm afraid that is not a bagel! That is bread with a hole in it!

(Honestly, I'm not really this argumentative. But a bagel-off isn't really a bagel-off unless you make outlandish statements. Plus, bagels in this neck of the woods are one of those things where people have steadfast allegiances to Montreal-, New York-, or whatever-style bagels and will fight to the death defending their choice. There is even a heated battle within Montreal as to whether the best bagels come from Fairmount or St Viateur; it's fairly obvious where I stand on the matter.)

I have been trying to figure out the secret to the Fairmount bagel for a few years. I've asked people who work there, but the batches are so big even their tips are imprecise. I also lack the requisite Cavern of Fire in which the bagels are baked.

That's not to say that I haven't come pretty close to getting it right.


This is a work in progress of sorts, but I'll share what I've got going so far. If you manage any better, you let me know!

For the dough, you need:

1.5 c warm water
5 tbs sugar
3 tbs oil
2.25 tsp dry yeast
1 tbs beaten egg
1 tbs malt powder (maple syrup works too)
4.5-5c all purpose flour
5 tsp vital wheat gluten
1 tsp kosher salt

And for boiling you need:
lots of water and 1/3 c honey to boil

1. Stir together the 1.5c water, the sugar, oil, yeast, egg, and malt. When the yeast has dissolved and proofed, stir in the salt and one cup of the flour. Fold in 3 more cups of flour until a soft dough forms.

2. Knead in the remaining flour (as needed) and let the dough rest for 10 minutes, covered.

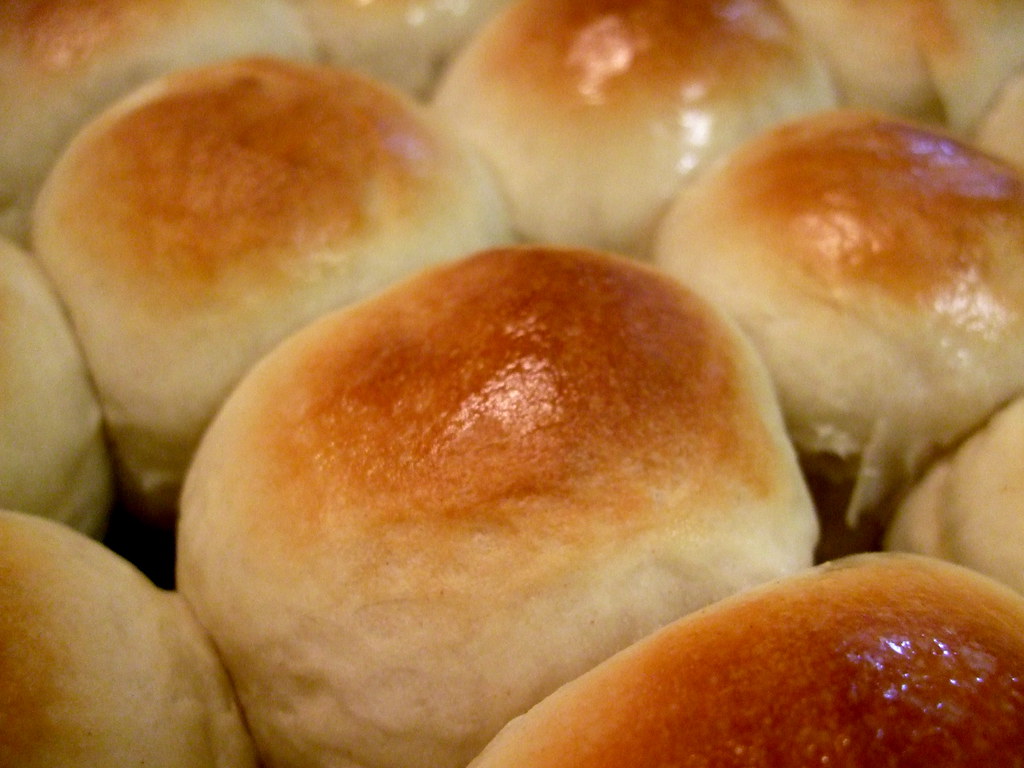
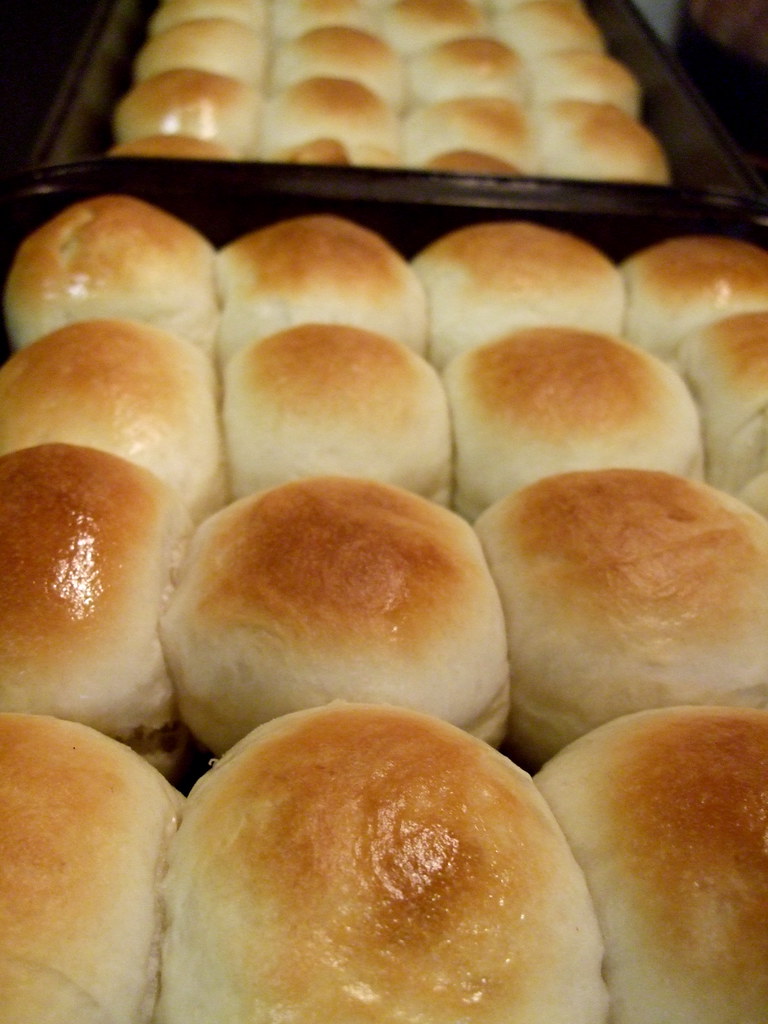
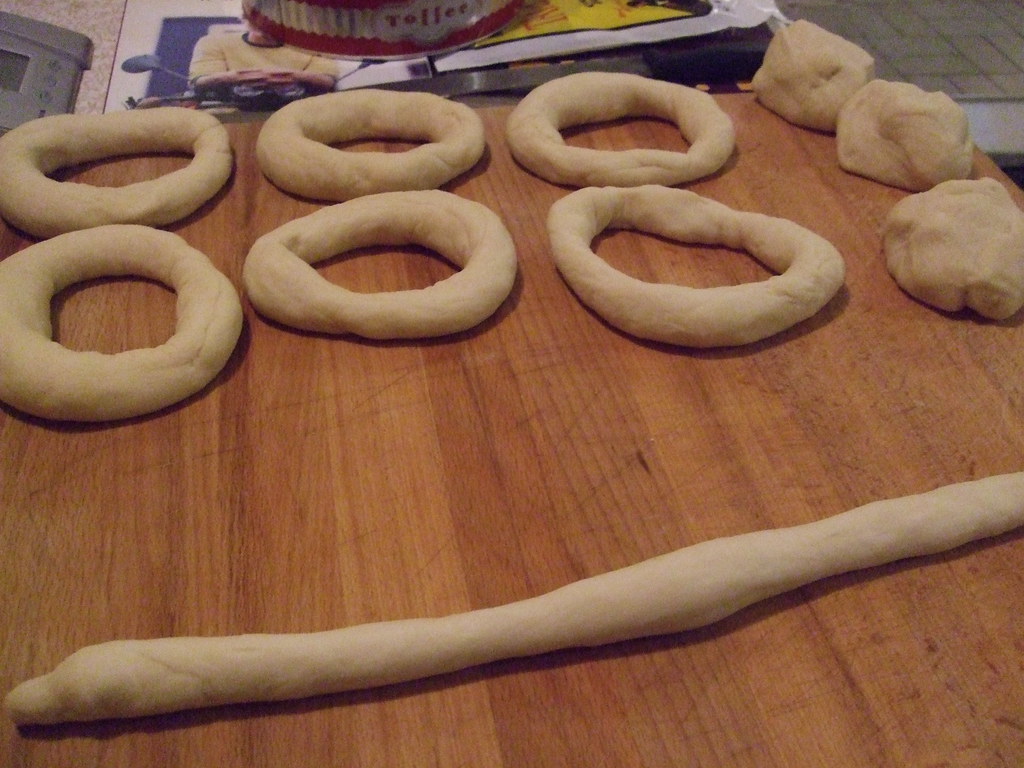
3. Divide the dough into 12 even pieces and shape. Roll each ball of dough out into a long snake about 1" in diameter. Shape into a ring and roll the ends together to join. Let the bagels rise for 30 minutes.


4. Meanwhile, preheat the oven and your baking stone (I really recommend a baking stone) to 425ºF and get about 6L of water and the honey on the boil.

5. Once the water is boiling, boil the bagels for about 1.5 minutes, turning once. Drain the bagels on a dish towl and place on a parchment paper-lined baking sheet. Sprinkly them with sesame seeds on both sides (or poppy seeds, or don't. It's your call.) I had to do mine in batches.


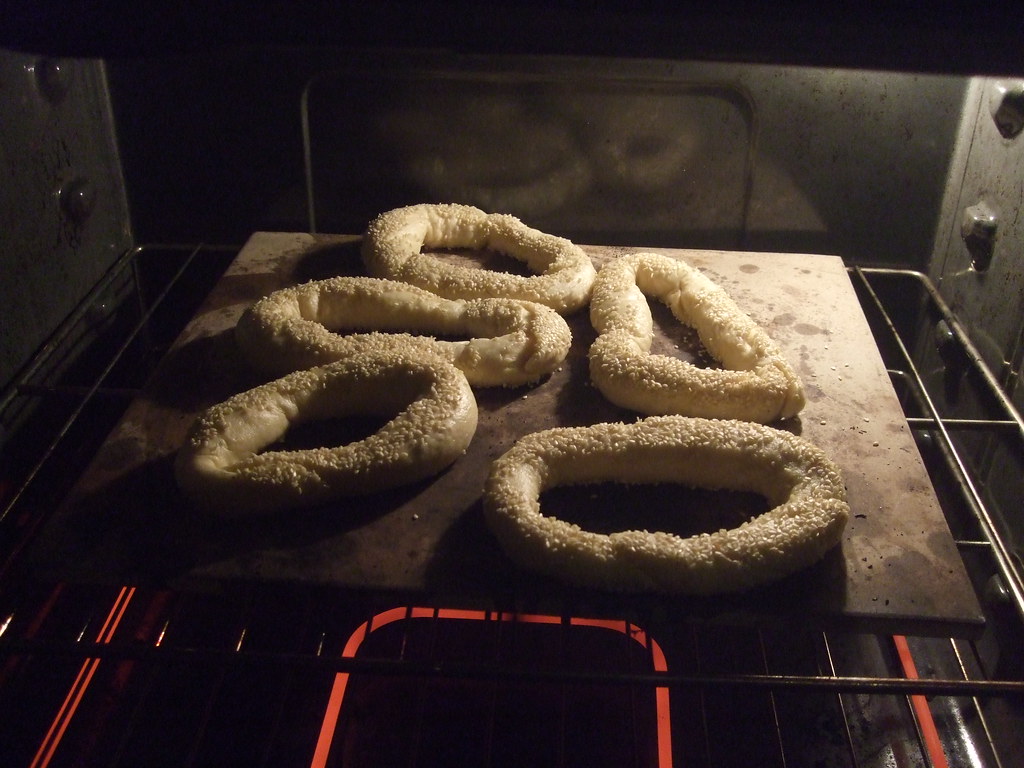
6. Either put the baking sheet in the oven or carefully place the bagels directly on the baking stone. Bake for 20 minutes, until golden, turning them once part way through.


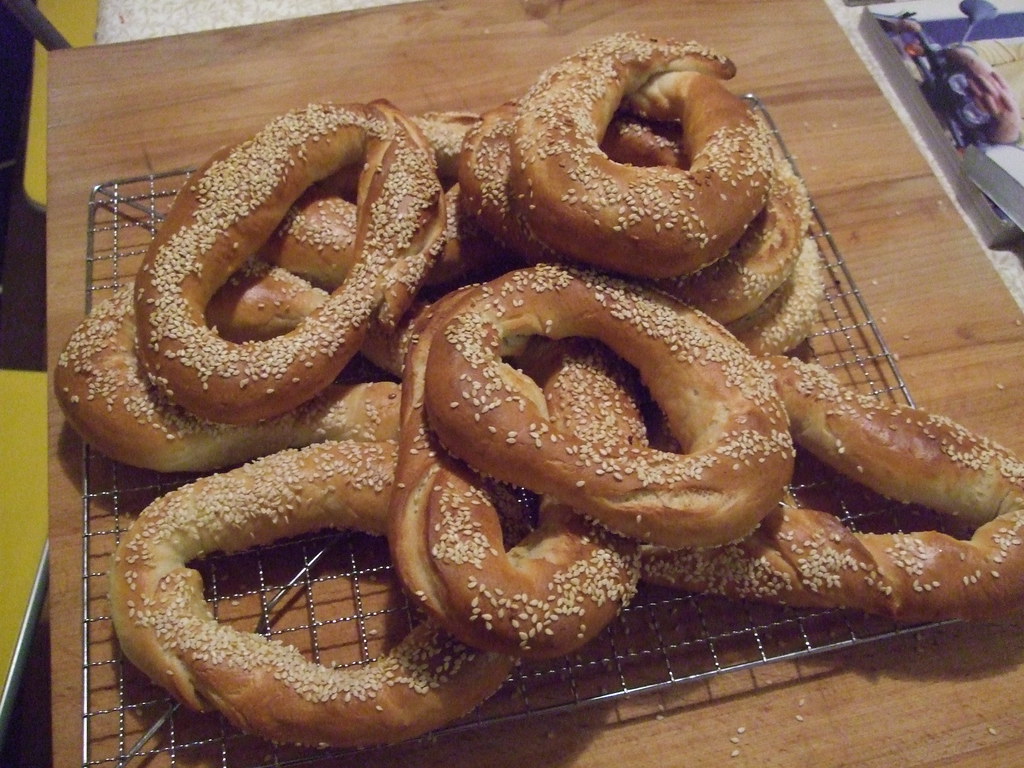
Enjoy fresh out of the oven, toasted the next day with butter, cream cheese, or, as M likes them, with peanut butter. Trust me, you'll never go back.

Digg Technorati Delicious StumbleUpon Reddit BlinkList Furl Mixx Facebook Google Bookmark Yahoo

Sunday, April 19, 2009

Penne with Rosemary

I wish this picture could express the amazing things that the rosemary did for the taste. This sauce had a really unexpected depth of flavour. It was rich and flavourful without being heavy - perfect for the oncoming spring. And because you add flour and milk at the last moment, the sauce coats each piece of pasta, so you can stretch a small amount of sauce (with a big taste) over a large amount of pasta. It's also an excellent pantry-dinner; I had all the things required already in the house (with some minor subs)!


I got the recipe from the Serious Eats column "Dinner Tonight", which is an excellent resource when you don't know what to make for dinner. Here's their recipe:

Spaghetti with Rosemary

- makes 4 servings -

Ingredients

2 tablespoons olive oil
2 tablespoons fresh rosemary leaves, minced (I used 1 tbs dried)
1 garlic clove, chopped
1/2 red chile, chopped (I used about 1/4 tsp dried chili flakes)
9 ounces canned tomatoes with juice, chopped
1 tablespoon flour
1 tablespoon milk
1 tablespoon water
12 ounces spaghetti (I used penne - no spaghetti in the house!)
Parmesan
Salt

Procedure

1. Pour the oil in a skillet and turn the heat to medium. Toss in the rosemary, garlic, and chile. Cook until fragrant, about two minutes. Pour in the chopped tomatoes. Bring to a boil, then reduce to a simmer, and cook for 30 minutes.

2. In a small bowl, whisk together the flour, water, and milk.

3. Bring a large pot of water to a boil for the spaghetti. Cook according to directions on the box.

4. When done simmering, season with the tomato sauce with salt, and then pour in the flour mixture. Mix together and then cook for 5 minutes.

5. Toss the drained spaghetti in with the rosemary sauce to coat. Serve with some grated parmesan.

Digg Technorati Delicious StumbleUpon Reddit BlinkList Furl Mixx Facebook Google Bookmark Yahoo

Tuesday, April 14, 2009

OM NOM Parker House Rolls

I am in love with Parker.....


.... House rolls! :D


I got this recipe from the Food Network years ago, who got it directly from the Omni Parker House Hotel, in Boston.

You need:
  • 6 cups of all-purpose flour
  • 1/2 c sugar
  • 2 tsp salt
  • 4.5 tsp yeast
  • 1 c butter, softened
  • 1 large egg
1. In a large bowl, combine 2 1/4 c flour, the sugar, salt, yeast, and half the butter. Mix while pouring in 2 cups of hot tap water.

2. Add the egg and beat. Mix in 3/4 more flour and continue beating. I'm using my KitchenAid for this. Stir in about 2 1/2 c more flour, or enough to make a soft dough.

3. Knead until smooth and elastic, working in more flour if you need it.

4. Put the dough into a greased bowl and cover. Let it rise for about 2 hours if your house is cold.

5. Punch down the dough and knead it into a smooth ball. Let it rest, covered, for 15 minutes.

6. Preheat your oven to 400ºF. Meanwhile, in each of two 9X13 roasting pans melt 1/4c of butter (so all the rest of the butter). This will grease the bottom of the pans.

7. Weigh your dough and divide that number by 40 because you are making 40 buns. Pluck off and weigh portions of the dough to make 40 even portions. Shape these into balls by folding them in on themselves and gently rolling to seal.

8. Put 20 rolls per pan, seam side down. Let the dough rise again, covered, for about an hour if your house is cold.

9. Bake rolls for about 15-20 minutes, until they're golden brown and smell heavenly. DEVOUR.


Digg Technorati Delicious StumbleUpon Reddit BlinkList Furl Mixx Facebook Google Bookmark Yahoo

Roasted Trout with Sundried Tomato Marinade

This was the fastest, easiest, most refreshing meal. It looks great, tastes great, and took under 25 minutes from start to end.


You need (serves 2):

  • A trout or salmon fillet about 2" thick and 5" by 6" in area
  • 2 tbs miracle whip or yoghurt
  • 2 tbs minced sun-dried tomatoes (I used dried, soaked them in hot water for 10 minutes, then minced them)
  • 1 tsp fresh ground black pepper, plus more to taste
  • 5 cloves of garlic, minced, divided
  • enough green beans for 2
  • 3/4 c orzo
  • 1 can chicken broth + 1 can water
  • 1 tsp butter
You can serve this with things other than green beans and orzo - this is just what appealed to me.

1. Preheat oven to 375ºF.


2. In a small bowl, mix about half of the minced garlic, the miracle whip/yoghurt, the sun-dried tomatoes, and the pepper.

3. Wash and dry the fish and place on a foil-lined baking sheet. Smear the marinade over the fish and put the fish in the oven.


4. Put your broth on to boil and start trimming and washing your beans. When the broth boils, pour in the orzo.


5. When the orzo is almost done (about 15 minutes), put the beans in a saute pan with 1 tsp butter and the rest of the garlic. Saute on medium-high. By the time the beans are done, the orzo and the fish will be too! Make sure the fish is opaque throughout before serving.

Digg Technorati Delicious StumbleUpon Reddit BlinkList Furl Mixx Facebook Google Bookmark Yahoo

Tuesday, April 7, 2009

Slow-Cooker Indian Butter Chicken

I've owned a slow-cooker for about eight years now, and tonight marks its inaugural use. It's not that I scorned the crock-pot; it's just that first of all, I love the act of cooking. I love standing in front of the stove and watching the flavours and colours come together. Second of all, I'm never really sure what I want for dinner until it's 4pm and I don't want to work any more and my mind and web browser turn to cooking and food blogs.

But this morning, having woken up with a sore throat, I knew that by the time my meeting-filled day wrapped up, I was going to be ready for nothing more than a couch, a cozy meal, and maybe a beer. Thus inspired, I looked through the many recipes my generous friends have sent my way, but I also looked to this lady, whose crock-pot blog is the go-to online for slow-cooker recipes.

I have been trying for years with no success to cook something akin to the butter chicken I order when at Indian restaurants. I decided to give it one more try, using this recipe, but with some modifications.


You need (adapted from the above link):

A 3.5 litre crock pot (but I bet you anything you could do this stove-top too!)

2 large-ish chicken breasts
2 onions, sliced into half-moons
1 can of tomato paste
1 can of coconut milk
5 cloves of garlic, minced
1.5" knob of ginger, minced
2 whole cinnamon sticks
15-20 whole cardomom pods
2 tsps whole pepper corns (I used mixed: red, green, and black)
1 tsp grated nutmeg
2 whole star anise
1 tsp whole cumin seeds
1 tsp whole cloves
2 bay leaves
1 tbs curry powder
2 cubes of chicken/veggie/beef stock (cheating, cheating, yes, yes.)
4 tbs butter
1/2 c frozen peas
1/2 c chopped sweet pepper (I had a yellow one on hand)
1/2 c cooked chickpeas (because they were there)

1. Put into the crock-pot all ingredients but the last three. I put my whole spices in a cheesecloth bag tied at both ends and I recommend you do the same.

2. Cook on low 7 hours or high 3.5 hours. After that time, taste it to adjust the spices and add in the last three ingredients. Cook another hour on low or another 30 minutes on high.

HOW EASY WAS THAT, HMMM? Serve it with basmati rice and naan bread, a recipe for which you can find here.

Digg Technorati Delicious StumbleUpon Reddit BlinkList Furl Mixx Facebook Google Bookmark Yahoo

Monday, April 6, 2009

"Bistro Chicken"

If you love crispy, juicy, herbed chicken with the skin on, you need to try this. It's delicious in the oven, but even better in the summer on the barbecue.


You need:

8-10 skin-on chicken drumsticks and/or thighs
1 tsp coarse sea salt
1 tbs dried or 2 tbs fresh rosemary, crushed
2 tsps dried thyme
1 tsp fresh ground black pepper
2 tbs olive oil
zest of one lemon (optional)

Preheat your oven to 400ºF and line a baking sheet with foil, if you're doing this in the oven. Otherwise, heat up your grill.

Mix all the non-chicken ingredients in a small bowl.

With your fingers, carefully separate the skin from the meat on a piece of the chicken. Stuff the space under the skin with a small amount of the herb paste. Repeat with the other chicken pieces. You may need more paste than I gave amounts for - I really just eyeball it and make more if I need it. The olive oil makes the meat super juicy and the herbs permeate throughout.

Arrange the chicken on the barbecue or on your baking sheet and bake/grill until the chicken is cooked through and the skin is crispy and golden.

This goes well with mashed potatoes and veg in the winter, and with grilled corn on the cob and potato salad in the summer. So easy and versatile, and your dinner guests will think you are made of magic.

Digg Technorati Delicious StumbleUpon Reddit BlinkList Furl Mixx Facebook Google Bookmark Yahoo

Friday, April 3, 2009

Seafood Chowder

The craving for some sort of fish soup seems to be going around these days. I was thinking about fish chowder last week when I was going through some old food magazines, combing for ideas, and then The Omnomicon featured a fish chowder earlier this week. Then I was talking to a friend last night, and despite not really liking fish all that much, she admitted that she had been thinking about making a fish chowder! With the stars happily aligned, I went straight to the butcher.


A good chowder starts with bacon. I bought good bacon. My elderly Polish butcher told me this is the best bacon for soup. It was pretty good. And beautiful.

I also bought:

2 medium leeks (whites only, halved and thinly sliced)
2 bunches of green onions (whites only, thinly sliced)
3 medium white potatoes (peel on, in 1 cm cubes)
1 c frozen/fresh/canned corn kernels
2 bay leaves
1/4 tsp thyme
1 small sweet red pepper (finely chopped)
6 c broth (fish or veggie or chicken)
1 can of crab meat
1 c heavy cream
2 filets of firm white fish (I used tilapia because it was on sale for some reason) cut into 1" chunks.

1. Heat up your dutch oven/stock pot and fry that bacon. Add the leeks part way through, and when the bacon is almost cooked, throw in the green onions. Now, my type of bacon didn't release its fat. Yours might, if you use regular bacon, so you may have to pour off some (but not all) before the next step.

2. Add your stock and potatoes along with the herbs and bring to a boil.

3. When the potatoes are soft, reduce the heat and add the crab (don't drain it!), the pepper, and the corn and cook until the pepper is softened. Then, when you're five minutes away from eating, add the fish and simmer until the fish is opaque throughout.

4. Heat up the cream in the microvave and stir it gently into the chowder.


I served this with a whole wheat variation on the french bread I made last week and it went over very well! This makes a big batch - enough to feed 6 or 8 for dinner - but it keeps in the fridge and it's even better on the second day.

Digg Technorati Delicious StumbleUpon Reddit BlinkList Furl Mixx Facebook Google Bookmark Yahoo