Saturday, January 2, 2010

Melting Shortbread

Hello blog! I had a lovely holiday! I made lots of cookies and ate lots of yummy things and I took photos, too. First up is shortbread. I have been trying to come close to my Nana's shortbread for a few years - it was magically melty and somehow she managed never to let it brown.

My mom got her hands on an old collection of recipes from the olden days. It is a thick wad of loose pages clipped together and well-thumbed by many ladies. It has a bunch of shortbread recipes, all with the names of the women who made them famous attached. I have been working my way through them each Christmas. This year, while I don't think I have exactly replicated Nana's recipe, I found one that I think I am happy with - it has a good balance of flakiness and firmness and I managed to bake them at a low enough temperature that none of them got the least bit brown. Also nobody in my family seemed to be able to stop eating them - I ended up making three batches in a week!


So here you go: the recipe.

You need:

3 c flour
1/2 c cornstarch
1 c icing sugar
2 c (1 pound) room-temperature butter.

1. Cream together the butter and the sugar. I used my (clean and scrubbed) hands to do this - you can use your hands for the whole recipe - fewer dishes and more likely to closely resemble the methods of Mrs. Periwinkle of 1915 Saskatoon, right?

2. Add the flour and cornstarch and mix until the mixture is crumbly and fluffy.

3. Press the dough into an ungreased, rimmed baking sheet. This recipe fills half a 18 by 13 inch jelly roll pan so you could do a double recipe or use a smaller pan, which I didn't have. Prick the dough deeply with a fork all over.

4. Bake for an hour and twenty minutes (about) at 270ºF - I put the timer on for 20 minutes at a time and checked them. Don't let them start to brown or turn golden around the edges!

5. Use a pizza cutter or a really sharp knife to slice the cookies into fingers and let cool. The serve them up! They were very popular with Santa this year. :)


Digg Technorati Delicious StumbleUpon Reddit BlinkList Furl Mixx Facebook Google Bookmark Yahoo

Tuesday, December 15, 2009

Best-Ever Banana Bread

I'm serious. This actually is the best banana bread you will ever taste. Whichever minion of Martha's came up with it deserves a nice firm handshake and a cigar. Or something. Anyways, this is the moistest (moistest?) banana bread you will taste. It keeps really well, although I don't think you'll have to worry about that.


Martha's original recipe calls for sour cream - this is the only thing I changed. I don't keep sour cream in the house usually, so I always make this bread with plain yogurt - fat free, even! It always turns out AWESOME. If you have sour cream to get rid of, feel free to use it instead of the yogurt in the recipe below. You can also add 1/2 c chopped nuts in at the end if you feel the urge.

You need:

1/2 c butter, softened, plus some for your loaf pan
1 c white sugar
2 large eggs
1 1/2 c flour
1 tsp baking soda
1 tsp salt
2-3 very very ripe bananas, mashed thoroughly
1/2 c plain yogurt
1 tsp vanilla

1. Preheat your oven to 350ºF and butter a 9×5×3" loaf pan. Preparation is important! :)

2. Cream the butter and sugar until it's light and fluffy, then beat in your eggs. I used my KitchenAid for this; you can use a hand mixer or even your own arms plus wooden spoon!

3. In a different bowl, mix your dry ingredients, except the nuts, if you're using them. Add the dry mixture to the butter mixture and combine gently. Then add your bananas, the yogurt, and the vanilla. After you have mixed all this in, you can add your nuts. Or chocolate chips, for that matter.

4. Pour the batter into the greased loaf pan and bake for about an hour and ten minutes. A toothpick or knife should come out clean when it's done. After it cools in the pan for about 15 minutes, you can cool it on a rack, or just eat it. Warm banana bread is the best - that way if you put butter on it (mmmmm) it gets all melty (see below). :)


Digg Technorati Delicious StumbleUpon Reddit BlinkList Furl Mixx Facebook Google Bookmark Yahoo

Wednesday, December 2, 2009

Beer-drinking Pretzels

Salty, poofy, chewy, and delicious.


These are amazing dipped in mustard. And even better with a nice cold pint.

I found the recipe somewhere on a Fresh Loaf thread somewhere, but the direct link is here. These are super easy, so if you've been reluctant to approach yeast before, here is a good opportunity.


You need:

1 tbs yeast
1 1/4 c warm water
1/4 c brown sugar
4 c flour

coarse salt
melted butter (about 3 tbs)
1/2 c baking soda dissolved in 3 c water at a simmer


1. Dissolve the sugar in the warm water and add the yeast to proof it. The yeast should get foamy after about 5 minutes.

2. Add the flour and mix it gently. The dough should be sticky but well combined. Don't over-knead it or you'll get tough pretzels.

3. Let the dough rise in a covered, oiled bowl for about 20-30 minutes depending on how warm your house is.

4. Divide the dough into 10 equal pieces and shape into long ropes about 1" in diameter. Shape these into pretzel shapes and prepare some greased baking trays. Dip each pretzel into the water-baking soda mixture and submerge for about 20 seconds. Then place each onto the tray.

5. Bake at 450ºF for about 5 minutes or until the pretzels are golden and smell like heaven. Remove from the oven, brush with butter, and sprinkle with coarse salt. TRY to wait as long as you can before chowing down on them, but they are really really good warm.


I also think this would be a fun baking activity to involve kids in if you happen to have any around! Kids are really good at making dough ropes. :) Digg Technorati Delicious StumbleUpon Reddit BlinkList Furl Mixx Facebook Google Bookmark Yahoo

Wednesday, November 25, 2009

Spanish Tortilla


When I was in Spain this summer I ate a lot of tortillas. They were our go-to when we were sick of fish in Cabo de Palos (didn't happen to me, but to other members of my family), when we didn't feel like eating heavy meat in Madrid, or when we wanted something to nosh on between lunch and dinner while drinking a lovely Alhambra beer. And now that winter is rapidly approaching, I think about sunny Spain a lot. Like, a REAL WHOLE LOT.

While I was in Spain I bought a Spanish cookbook, but I hadn't made use of it (other than looking through it and reminiscing) until tonight. A tortilla is a perfect light dinner and it only uses pantry staples so you don't have to go out to buy anything fancy. And, if you're like me, you will get to think about lying on beautiful beaches like this one while eating it:


Here's what you need:

1 kg potatoes (about 7 small ones), thinly (THINLY) sliced (don't bother peeling them)
2 medium onions, thinly sliced
8 eggs (I made mine with 6 but 8 would have been yummier)
plenty of olive oil and salt and pepper.

1. Heat about 4-5 tbs of olive oil in a cast-iron frying pan over medium-high. When the oil is hot but not smoking (that's too hot), throw in your potatoes and brown them for 5 minutes.

2. After 5 minutes, add the onions and reduce the heat. You want to cook the potatoes through without burning them. It might take up to 30 minutes. The potatoes should be soft.

3. Meanwhile, beat your eggs with a whisk. When the potatoes are cooked, let them cook in a strainer for a while (you get rid of a bit of oil that way, too) and then mix them in with the egg. Add a fair bit of salt and pepper.

4. With the cast-iron pan still on low, pour in the egg and potato mixture. There should still be oil coating the pan from when you were cooking the potatoes. Let the tortilla cook SLOWLY. You need to cook it until egg is almost entirely cooked through without the bottom burning. DO NOT STIR THE EGGS but DO curve over the edges of the tortilla with a spatula so that the edges end up rounded.

5. When it is just about cooked through so that there are almost no runny bits on top - now this is a bit tricky - take a place and place it on top of the pan. You are going to flip that tortilla. So, holding the plate steady on the pan with one hand, flip the tortilla out of the pan and onto the plate. Then slide it carefully back into the hot pan but on the other side. Got it?

6. Let the tortilla brown on that side, then slice and serve! You can add variations - zucchini, ham, cheese - but the potato version is classic. It's pretty tasty as cold leftovers too - they serve it cold in Spain.


Digg Technorati Delicious StumbleUpon Reddit BlinkList Furl Mixx Facebook Google Bookmark Yahoo

Sunday, November 15, 2009

Yorkshire Pudding!

oh yeah, and roast beef, too. And gravy, and peas, and roasted carrots, and garlic mashed potatoes. But most importantly, YORKSHIRE PUDDING.


This was my first attempt at this grand and most favourite meal. I did overcook the meat, which I think is a common issue, but it was still so so tasty. I am currently enjoying cold roast beef sandwiches with mustard.

SO: Roast beef. I bought a "French Roast" for $7/kg. I made deep slits in the meat and inserted slivers of garlic into it. I guess I used about four cloves of garlic. I seasoned the outside with salt and pepper, and seared the outside in hot oil in a cast iron pan until the outside was browned.

Then I put it on a rack in a roasting pan surrounded by carrots and onions and tented it with foil. It went in the oven at 350 until my thermometer read 145 - according to everything I've read, that would have been medium-rare, but I guess next time I'll take it out sooner as it was closer to well-done.

While the meat was cooking, I chopped up a bunch of potatoes and threw them in a big pot of water with 6 or 7 whole garlic cloves. When the potatoes were soft, I drained them and mashed the potatoes and the garlic cloves with lots of butter, milk, garlic salt, and some ricotta cheese for creaminess. I kept the potato water to make gravy later.

The Yorkshire pudding recipe I got from Gordon Ramsay via Serious Eats. I had seen Gordon Ramsay lecture people about proper Yorkshire puddings so I figured he was the guy to go to for instructions on this matter.

So I stirred together a cup of flour with 1/2 tsp of salt and added 4 eggs and (in two goes) 1 1/4 c milk. I beat the mixture until it was smooth and then I just let it sit on the counter until it was ready.

About 15 minutes before I thought the roast would be ready, I turned up the temperature of the oven to 450 and poured 1 tsp of canola oil into each hole of a 12-hole muffin tray and preheated the oil in the tray. Then I divided the batter between the muffin holes - it should sizzle in the hot oil when you add it - and then stuck the tray back in the oven until the puddings are brown and puffy. I had taken out the roast by this time, of course.

While the roast is resting and the puddings are baking, you can cook your peas and make your gravy out of the drippings from the roast and your potato water.

Serve the puddings in a basket lined with paper towels, because they are a little greasy. But they are the perfect compliment to a roast dinner and go amazingly well with gravy.

Digg Technorati Delicious StumbleUpon Reddit BlinkList Furl Mixx Facebook Google Bookmark Yahoo

Wednesday, November 11, 2009

Soupe à l'Oignon Gratinée

... also known as French Onion Soup.

I've been making this for years, but kind of according to my own recipe, which was good. But tonight I took a look at Julia Child's, and I have to say she totally kicked my ass. I'm really not surprised though - the woman did write a few cookbooks, after all.


I used to use red wine to fill out the broth. Julia's uses vermouth and brandy - a distinct improvement. However, it did mean that I was stuck with some "superfluous" red wine. On a Wednesday, no less! :)

You need:

5 c thinly sliced yellow onions
3 tbs butter (oh Julia... )
1 tbs oil
1 tsp salt
1/4 tsp sugar
3 tbs flour
2 litres beef stock
1/2 c dry white vermouth or white wine
pepper to taste
3 tbs cognac
rounds of hard-toasted French bread
1.5 c grated Swiss or Parmesan cheese (I used cheddar but Julia says Swiss is best)

1. Melt the butter and oil over low heat (seriously - low) and sautee the onions for 15 minutes. They should get nice and translucent.

2. Raise the heat to moderate and stir in the salt and sugar. Cook for 30-40 minutes until the onions are nice and golden brown. This adds depth to the soup. YUM.

3. Add the flour and cook for 3 minutes. Then add the hot beef stock and vermouth while the pot is off the heat. Then simmer the soup for 40 minutes.

4. Meanwhile, toast your baguette slices. When the soup is done simmering, stir in the cognac (I used brandy).

5. Pour the soup into French Onion Soup bowls (I got mine for 99¢ at the Salvation Army!) or oven-proof individual bowls. Stir a bit of cheese into the soup. Float the toasted bread on top and top with more cheese. Julia says you're also supposed to stir grated raw onion into the soup but I opted not to do this. Still delicious!

6. Bake the soup in a preheated oven at 325º for 20 minutes, then broil for a few minutes until the melted cheese browns.

7. Let the hot soup sit a few minutes and enjoy!


Digg Technorati Delicious StumbleUpon Reddit BlinkList Furl Mixx Facebook Google Bookmark Yahoo

Monday, November 2, 2009

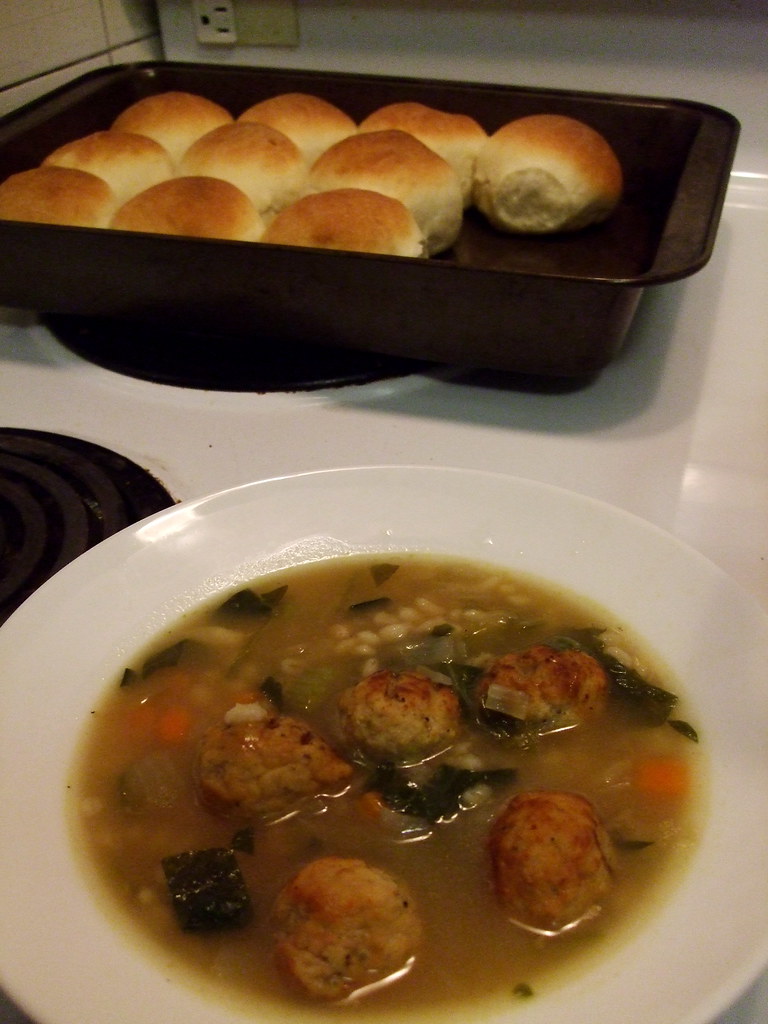
Italian Wedding Soup

You may have noticed that things are getting a little cozier around here - soups, pies, breads - they're going to get cozier, too! Winter is a-comin'! That's where this hearty meatball soup comes in. Usually, Italian wedding soup is made with small pasta, but I decided to use barley instead. It's a bit heartier than pasta and it's what I had on hand! It turned out really nicely - barley added a great texture to the soup.


You need:

1 tbs olive oil
1 medium onion, finely diced
1 stalk of celery, finely diced
1 carrot, finely diced
2/3 c pot barley
8 c chicken stock
3 c fresh baby spinach, roughly chopped
20 home-made or store bought chicken or turkey meatballs

1. First, saute your onion, celery, and carrot in the olive oil. When the onions are translucent, add the stock and the barley and bring to a boil. Leave it at a vigorous simmer for 30 minutes or so - until the barley is cooked.

2. Add the meatballs and the spinach and boil until the meatballs are cooked (if you used fresh/raw) and the spinach is wilted.

Serve with yummy 60-minute dinner rolls: YES they only take 60 minutes!! AND they are fluffy and delicious! It's like magic. :)


I opted for a half recipe so what you see here makes 12 rolls, not 24 as in the original recipe. I'm sure this will work without a kitchenaid, but it's what I have!

You need:

1/4 c. milk
2 tbs sugar
1 tsp salt
1.5 tbs butter
3 1/3 tsp yeast
3/4 c lukewarm water
3 c flour

1. Melt the butter, milk, sugar, and salt in the microwave. Stir to make sure they are all dissolved.

2. In the bowl of your mixer, dissolve the yeast in the warm water. Then add the milk mixture to it and stir.

3. Add the flour a bit at a time, mixing all the while, until all the flour is added. Knead until you get a sticky but cohesive dough ball.

4. Let the dough rise for 15 minutes in an oiled covered bowl.

5. Shape the rolls into 12 portions and place in an oiled baking pan - 9 X 13 worked for me but muffin tins do the trick too. Let rise another 15 minutes.

6. Bake in a preheated oven at 425ºF for 12 minutes. The rolls should be deliciously golden at this point.


Digg Technorati Delicious StumbleUpon Reddit BlinkList Furl Mixx Facebook Google Bookmark Yahoo