Showing posts with label yeast. Show all posts

Wednesday, December 2, 2009

Beer-drinking Pretzels

Salty, poofy, chewy, and delicious.


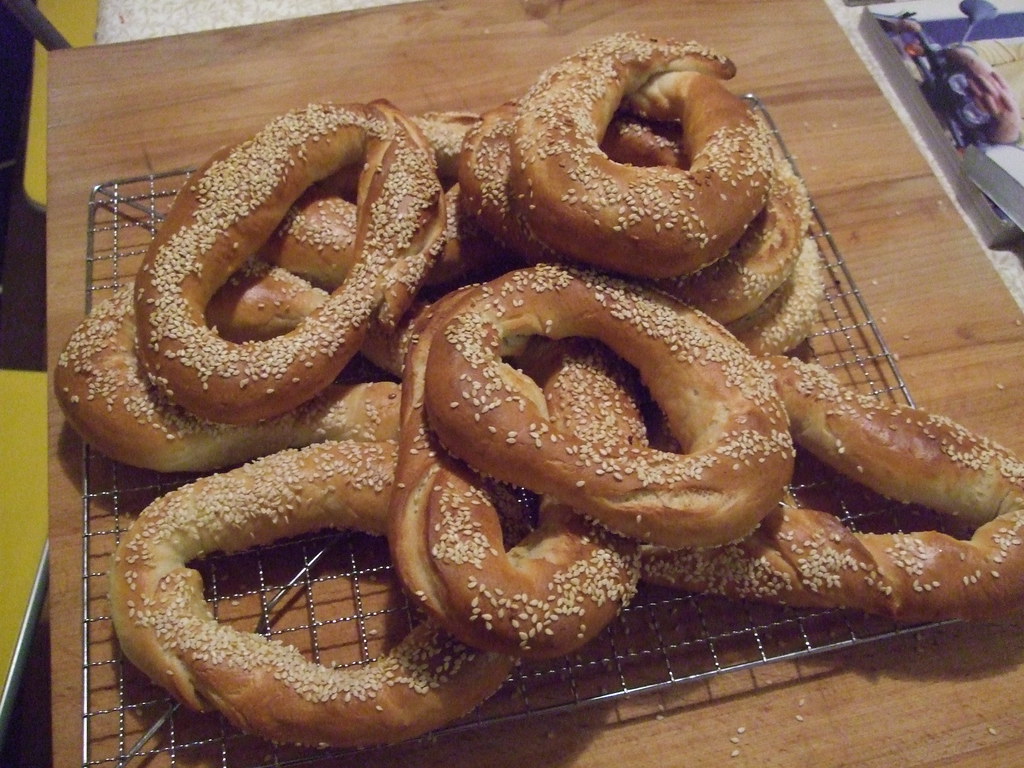
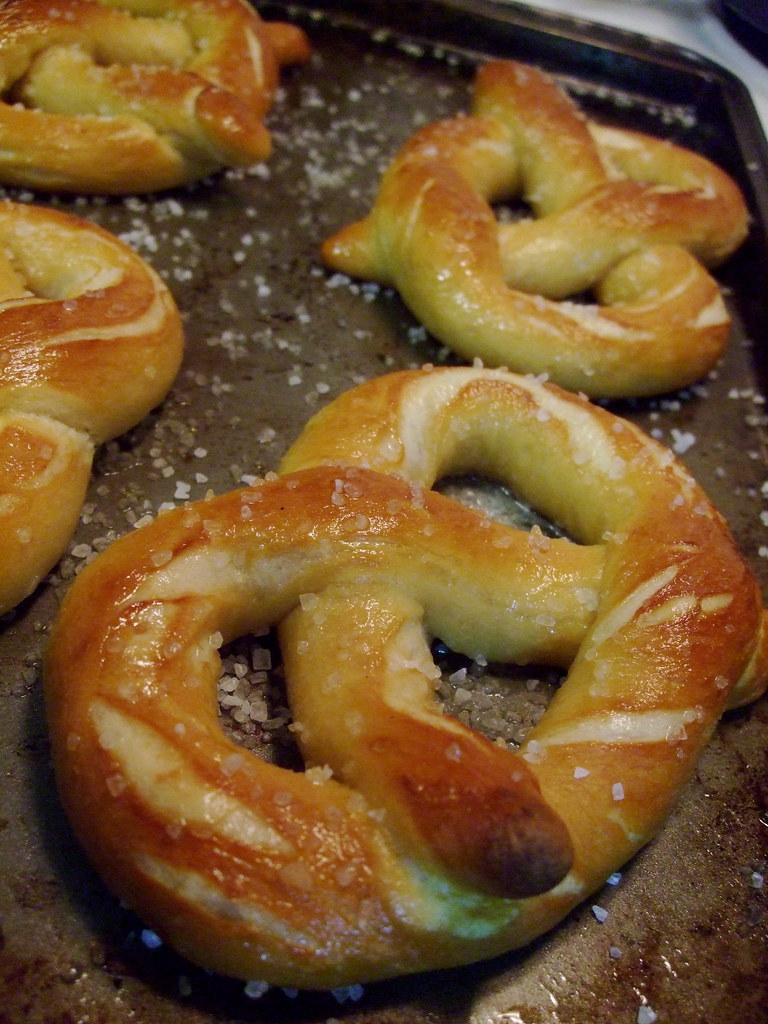
These are amazing dipped in mustard. And even better with a nice cold pint.

I found the recipe somewhere on a Fresh Loaf thread somewhere, but the direct link is here. These are super easy, so if you've been reluctant to approach yeast before, here is a good opportunity.


You need:

1 tbs yeast
1 1/4 c warm water
1/4 c brown sugar
4 c flour

coarse salt
melted butter (about 3 tbs)
1/2 c baking soda dissolved in 3 c water at a simmer


1. Dissolve the sugar in the warm water and add the yeast to proof it. The yeast should get foamy after about 5 minutes.

2. Add the flour and mix it gently. The dough should be sticky but well combined. Don't over-knead it or you'll get tough pretzels.

3. Let the dough rise in a covered, oiled bowl for about 20-30 minutes depending on how warm your house is.

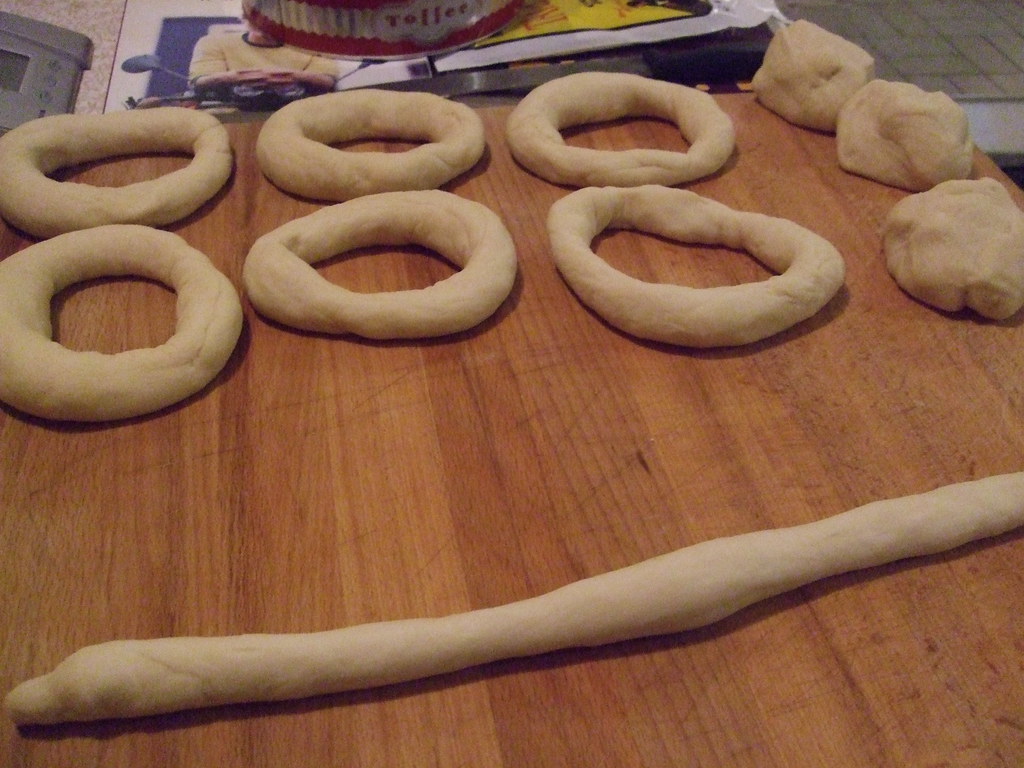
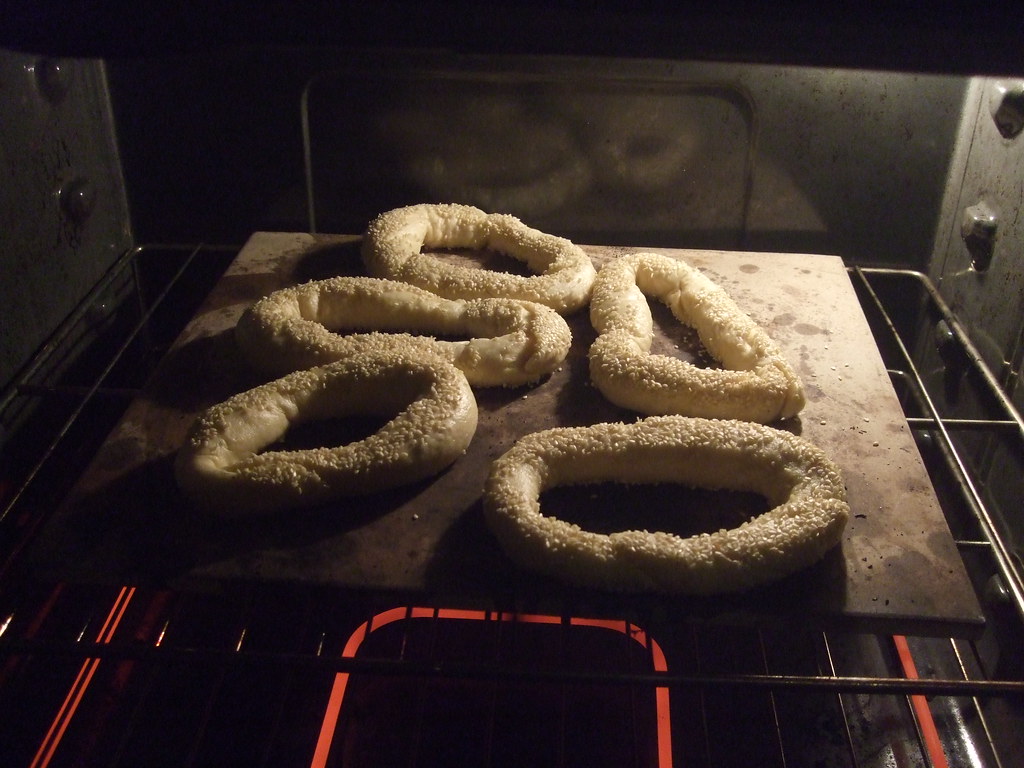
4. Divide the dough into 10 equal pieces and shape into long ropes about 1" in diameter. Shape these into pretzel shapes and prepare some greased baking trays. Dip each pretzel into the water-baking soda mixture and submerge for about 20 seconds. Then place each onto the tray.

5. Bake at 450ºF for about 5 minutes or until the pretzels are golden and smell like heaven. Remove from the oven, brush with butter, and sprinkle with coarse salt. TRY to wait as long as you can before chowing down on them, but they are really really good warm.


I also think this would be a fun baking activity to involve kids in if you happen to have any around! Kids are really good at making dough ropes. :) Digg Technorati Delicious StumbleUpon Reddit BlinkList Furl Mixx Facebook Google Bookmark Yahoo

Tuesday, June 23, 2009

Pizza: New and Improved!

GUESS WHAT!?


You can make really good pizza dough in about 2 hours. And you can do it in your own oven. Remember this recipe for ciabatta? If you halve it, it makes a perfect pizza dough crust for two. Note that you can make this dough by hand, but a kitchenaid-type device certainly makes things faster and easier.


To prove this to you, I invite you to imagine you are biting into the pizzas in the following photos:


We divided our pizza dough into two personal pizzas so we could have two types. One has red onions, red peppers, and mozzarella, and the other has spinach, cherry tomatoes, and mozzarella. We baked them at 500º on a pre-heated baking stone for about 15 minutes.


This dough is amazing and I urge you to try it. I imagine it would do well on the barbecue too, although this is an adventure I have yet to try.


Digg Technorati Delicious StumbleUpon Reddit BlinkList Furl Mixx Facebook Google Bookmark Yahoo

Sunday, June 7, 2009

Oatmeal-Potato Bread

I have not been cooking as much as I would like. Well, I've been cooking my same amount, but it's not really anything to show off - shake n bake, plain pasta, pizza, etc. I'm trying to get a big project done, and while I would *love* to procrastinate by daydreaming about what meals I could cook, sometimes school comes first.

Enter the sandwich. A very important school-going staple; not to be trifled with. It requires decent bread that can stand up to the rigours of a back pack and tomatoes without falling apart.

I play around with sandwich loaves - I haven't yet found a whole wheat one that I'm entirely happy with. I've used this one, which is delicious but has so much sugar in it, and various others floating around online, or in my thousands of cooking and baking books. This recipe comes from Beth Hensperger's The Bread Bible and makes two good-sized loaves. I chose it because I had some left-over mashed potato waiting to be used up, and not enough time or energy to want to do a 24 hour whole wheat loaf as Peter Reinhart suggests. Maybe when these two are done.


Beth describes the bread as moist and slightly sweet, and very easy to make. She's right - mine rose beautifully even though my house is usually on the chilly side. When it was baking, the house smelled delicious and slightly nutty. I really wish you could photograph smell! When it was ready to cut, I discovered that the crumb is light and airy and makes perfect toast! It has a delicious flavour and a soft texture. This is a keeper of a recipe, at long last!

Look at the crumb in this shot! Representative of what is inside...


You need:

1 c mashed potato
2 tbs butter (unless your mashed potato already has butter in it, like mine did)
1 tbs yeast
1/2 c warm water
1 tbs sugar + 1 pinch
1.5 c warm milk (I was out so I used 3 tbs plain yogurt mixed in with enough water to make 1.5 c)
1 tbs salt (I did not add salt as my potatoes were already salted enough)
1.5 c rolled oats
5 c all purpose flour (I used 2 c whole wheat and 3 c white unbleached)


1. Dissolve the pinch of sugar in the 1/2 c warm water and sprinkle the yeast on top to dissolve. Let proof 10 minutes, until foamy.

2. In a mixing bowl or a stand mixer, put the potato, yeast mixture, the rest of the sugar, the milk, salt, oats, and 2 c of the flour. Beat until it's combined. Add the rest of the flour by the half-cup until you have a very moist dough that only just clears the sides of your dough. If you add too much flour to make a stiffer dough, the oats will suck up all the moisture and you'll end up with dry, terrible bread. When you're done kneading the dough should be smooth and springy.

3. Put the dough in an oiled bowl and cover. It'll rise for about 1.5 hours and get nice and puffy.

4. Tip the dough out onto your work surface, which you've floured so the dough doesn't stick. Divide it in two - you're making two loaves. Shape the dough into loaves by following this amazing tutorial on The Fresh Loaf. Put each loaf in a greased 9-by-5 loaf pan and let rise again, covered, for another 40 minutes.

5. Preheat your oven to 425. Bake the loaves for 10 minutes at this heat, then at 350 for another 35-40. The loaves should sound hollow when you tap them on the bottom. Let them cool completely before cutting into them - I know it's hard, but the bread won't taste as good if you cut into it too early! Promise!

Digg Technorati Delicious StumbleUpon Reddit BlinkList Furl Mixx Facebook Google Bookmark Yahoo

Tuesday, May 26, 2009

Cheater's Ciabatta

Normally, ciabatta, the delicious, porous, Italian bread, takes hours and hours of waiting. The gluten strands that make those nice, big, ready-for-butter holes take time to develop. You can cheat a bit, though.

The reason all those no-knead breads work is that if you give bread dough enough time, the gluten strands will develop on their own. They just need 18-24 hours to do so. Usually we knead bread to speed up the development of the gluten so that a loaf of French bread might only take 8-10 hours. It's kind of logical that if you leave a dough for a long time and don't have to knead it, you'd be able to knead the dough a lot and not have to wait, right?


This ciabatta recipe only takes 4-5 hours because you knead this dough within an inch of its life. Once again, The Fresh Loaf has come to the rescue and made last-minute fresh bread possible.

-------

You need:
500g bread flour (I used all-purpose and added a few tbs of vital wheat gluten - kind of an experiment)
475g water
15 g salt
2 tsp yeast

Directions (from the above link):

1. In Kitchen Aid style mixer: Mix all ingredients roughly till combined with paddle, let it rest for 10 minutes.

2. With the paddle , beat the living hell out of the batter; it will start out like pancake batter but in anywhere from 10 to 30 minutes it will set up and work like a very sticky dough. if it starts climbing too soon, then switch to the hook. You'll know it's done when it separates from the side of the bowl and starts to climb up your hook/paddle and just coming off the bottom of the bowl. I mean this literally about the climbing, i once didn't pay attention and it climbed up my paddle into the greasy inner workings of the mixer. It was not pretty! Anyway, it will definetely pass the windowpane test. (Note: See a great picture tutorial on what it's supposed to look like here.)

3. Place into a well oiled container and let it triple! it must triple! For me this took about 2.5 hours

4. Empty on to a floured counter, cut into 3 or 4 pieces. Spray with oil and dust with lots o' flour. Let them proof for about 45 minutes, which gives you enough time to crank that oven up to 500F.


5. After 45 minutes or so the loaves should be puffy and wobbly. Now it's iron fist, velvet glove time. Pick up and stretch into your final ciabatta shape (~10" oblong rectangle) and flip them upside down (this redistributes the bubbles, so you get even bubbles throughout), and onto parchment or a heavily floured peel. Try to do it in one motion and be gentle, it might look like you've ruined them completely, but the oven spring is immense on these things.

6. Bake at 500F , rotating 180 degrees half way through.


-------

The crumb in this bread is great - big and porous - and the crust is delicious - golden and chewy. I usually make a few loaves of french bread the long way every two weeks or so and freeze extra, but I think this way will enable me to have fresh bread every day if I wanted to!

I'm pretty sure I didn't stretch mine out enough - it looked so flat when I put it in the oven, but the recipe is right - big oven spring! I think "real" ciabatta is supposed to be a bit flatter.

Also, if you don't have a kitchen aid or something like that, you can, of course, beat the living daylights out of your dough by hand - it'll just take a bit longer and your arm may fall off.

Digg Technorati Delicious StumbleUpon Reddit BlinkList Furl Mixx Facebook Google Bookmark Yahoo

Tuesday, April 21, 2009

Montreal-Style Bagels

I promised Annalise over at Knead to be Loaved a "bagel-off" when she posted her bagel recipe a while ago. Well, the fight is on! ;)

There are lots of bagel recipes floating around, but once you've tasted a fresh, warm bagel from Fairmount Bagels, none of those big, bready, more-dough-than-hole impostors will do. A real bagel should be dense and chewy! If your bagel has the texture of round bread with a hole in it, well, I'm afraid that is not a bagel! That is bread with a hole in it!

(Honestly, I'm not really this argumentative. But a bagel-off isn't really a bagel-off unless you make outlandish statements. Plus, bagels in this neck of the woods are one of those things where people have steadfast allegiances to Montreal-, New York-, or whatever-style bagels and will fight to the death defending their choice. There is even a heated battle within Montreal as to whether the best bagels come from Fairmount or St Viateur; it's fairly obvious where I stand on the matter.)

I have been trying to figure out the secret to the Fairmount bagel for a few years. I've asked people who work there, but the batches are so big even their tips are imprecise. I also lack the requisite Cavern of Fire in which the bagels are baked.

That's not to say that I haven't come pretty close to getting it right.


This is a work in progress of sorts, but I'll share what I've got going so far. If you manage any better, you let me know!

For the dough, you need:

1.5 c warm water
5 tbs sugar
3 tbs oil
2.25 tsp dry yeast
1 tbs beaten egg
1 tbs malt powder (maple syrup works too)
4.5-5c all purpose flour
5 tsp vital wheat gluten
1 tsp kosher salt

And for boiling you need:
lots of water and 1/3 c honey to boil

1. Stir together the 1.5c water, the sugar, oil, yeast, egg, and malt. When the yeast has dissolved and proofed, stir in the salt and one cup of the flour. Fold in 3 more cups of flour until a soft dough forms.

2. Knead in the remaining flour (as needed) and let the dough rest for 10 minutes, covered.

3. Divide the dough into 12 even pieces and shape. Roll each ball of dough out into a long snake about 1" in diameter. Shape into a ring and roll the ends together to join. Let the bagels rise for 30 minutes.


4. Meanwhile, preheat the oven and your baking stone (I really recommend a baking stone) to 425ºF and get about 6L of water and the honey on the boil.

5. Once the water is boiling, boil the bagels for about 1.5 minutes, turning once. Drain the bagels on a dish towl and place on a parchment paper-lined baking sheet. Sprinkly them with sesame seeds on both sides (or poppy seeds, or don't. It's your call.) I had to do mine in batches.


6. Either put the baking sheet in the oven or carefully place the bagels directly on the baking stone. Bake for 20 minutes, until golden, turning them once part way through.


Enjoy fresh out of the oven, toasted the next day with butter, cream cheese, or, as M likes them, with peanut butter. Trust me, you'll never go back.

Digg Technorati Delicious StumbleUpon Reddit BlinkList Furl Mixx Facebook Google Bookmark Yahoo

Tuesday, April 14, 2009

OM NOM Parker House Rolls

I am in love with Parker.....


.... House rolls! :D


I got this recipe from the Food Network years ago, who got it directly from the Omni Parker House Hotel, in Boston.

You need:
  • 6 cups of all-purpose flour
  • 1/2 c sugar
  • 2 tsp salt
  • 4.5 tsp yeast
  • 1 c butter, softened
  • 1 large egg
1. In a large bowl, combine 2 1/4 c flour, the sugar, salt, yeast, and half the butter. Mix while pouring in 2 cups of hot tap water.

2. Add the egg and beat. Mix in 3/4 more flour and continue beating. I'm using my KitchenAid for this. Stir in about 2 1/2 c more flour, or enough to make a soft dough.

3. Knead until smooth and elastic, working in more flour if you need it.

4. Put the dough into a greased bowl and cover. Let it rise for about 2 hours if your house is cold.

5. Punch down the dough and knead it into a smooth ball. Let it rest, covered, for 15 minutes.

6. Preheat your oven to 400ºF. Meanwhile, in each of two 9X13 roasting pans melt 1/4c of butter (so all the rest of the butter). This will grease the bottom of the pans.

7. Weigh your dough and divide that number by 40 because you are making 40 buns. Pluck off and weigh portions of the dough to make 40 even portions. Shape these into balls by folding them in on themselves and gently rolling to seal.

8. Put 20 rolls per pan, seam side down. Let the dough rise again, covered, for about an hour if your house is cold.

9. Bake rolls for about 15-20 minutes, until they're golden brown and smell heavenly. DEVOUR.


Digg Technorati Delicious StumbleUpon Reddit BlinkList Furl Mixx Facebook Google Bookmark Yahoo

Sunday, March 29, 2009

No-Knead Bread

Well, I bit the bullet and tried out Mark Bittman's famous no-knead bread. And I have to say, I think it's more trouble than it's worth, but that may just be my own circumstances.

I had no container in which I could bake the bread. Baking the bread in a dutch oven or a cast-iron pot keeps the steam in with the bread, making the crust nice and chewy, like real French bread. So in the end, after shaping and resting the bread, I baked it directly on my baking stone, using a tray of ice cubes on the bottom shelf to create steam. The crust was nice and chewy but the crumb left something to be desired, even after having risen for 24 hours. The flavour was good, but wasn't very salty, and didn't have the lovely nutty texture a long rise usually gives.


If you want to make delicious French bread and have absolutely no time whatsoever to be at home and supervise, then for sure, go this way. You'll get rave reviews and people will still love you.

But, if you have a day when you're going to be home anyways, working or doing chores, or watch TV etc, then I suggest you follow this method. This bread is almost as easy, does not require a dutch oven (although I'm sure it would be nice baked in there, too!), and can be shaped into lovely baguettes which are useful for impressing boyfriends, guests, et al.


If you can't see the recipe, first of all you should join The Fresh Loaf because it's awesome, but I'll reproduce it here, too.

Poolish
1 cup flour
1 cup water
1/4 teaspoon instant yeast

Final Dough
1 pound flour (about 4 cups)
10-12 ounces water (by weight, not volume!)
1 teaspoon instant yeast
2 teaspoons salt
all of the poolish

Combine the ingredients for the poolish in a small bowl the night before baking. Cover the bowl with plastic wrap and leave the poolish out at room temperature overnight.

The next day, prepare the final dough. Combine all the ingredients except for the poolish in a bowl and let it sit for 25 minutes. This develops the gluten in the bread and makes nice holes in the crumb. Then add the poolish in and mix them together until you have a VERY wet dough. Your hands will look like you put them in ... well, a lot of flour and water.

Knead the dough as best you can. Then put the dough in an oiled bowl, cover it, then leave it for 45-60 minutes. Come back and fold it ever 45 minutes to an hour, so about 6 times.

Shape the dough how ever you like and put the shaped loaves on parchment paper to rise. The Fresh Loaf has great shaping tutorials, not to mention more tips and tricks for French Bread. I usually make two oval loaves out of this amount of ingredients. Cover your loaves and let them rise for another 90 minutes. Meanwhile, preheat your oven to as hot as it can safely go. I usually set mine to 450-475, with my baking stone in right from the start.

Right before you're going to pop those loaves in, get the sharpest knife you have, or a razor blade, and make some slashes about 1/2" deep along the length of the bread. This will help the bread rise up and not split at the bottom. Bake for about 20 minutes. As you put the loaves in, put in a baking dish full of ice cubes. After 5 minutes, turn the temperature down to 450. The loaves should be brown and toasty on the top and sound hollow on the bottom when tapped.

Even though you're going to want to bite those loaves right out of the oven, resist. Leave them cool until they're mostly cold, and only then slice them. The gluten strands that make French bread so delicious continue to develop until the bread is cool. You'll end up with gummy crumb if you cut it too early.


See also: Naan Bread

Digg Technorati Delicious StumbleUpon Reddit BlinkList Furl Mixx Facebook Google Bookmark Yahoo

Tuesday, March 24, 2009

Braided Onion Loaf

Here's a post from October, but this bread is yummy any time of year. You can also shape it into a couple of loaves instead of braiding it.

----------

Since it's Canadian thanksgiving this weekend, I made a festive loaf to take to dinner at boy's parents' this weekend.


The recipe is from The Fresh Loaf, which is an amazing resource. Anyways, here's the recipe, copy and pasted:

________________________________________________________________________________

Poolish:
1 cup all-purpose unbleached flour
1 cup water
1/4 teaspoon instant yeast

Dough:
Poolish
3-3 1/2 cups all-purpose unbleached flour
1/2 cup milk
2 teaspoons instant yeast
2 tablespoons butter or shortening
2 tablespoons sugar
1 1 3/8 ounce package of onion soup mix
2 tablespoons grated Parmesan cheese
1 egg

Wash:
1 egg
1 tablespoon milk

The night before, in a bowl, mix together the poolish until it form a batter. Cover with plastic wrap and set aside overnight.

The next morning, combine 2 cups of the flour, the yeast, the sugar, the onion soup mix. Mix in the poolish, the milk, one of the eggs, the butter, and the Parmesan cheese with a wooden spoon. Add more flour a quarter cup at a time until a proper dough forms, one that is dry enough that you can hand knead it yet moist enough that it is still tacky to the touch.

Pour the dough out of the bowl onto a clean work surface and knead the dough for approximately 10 minutes. Return the dough to a clean, greased bowl, cover with plastic, and allow to rise until doubled in size, approximately 90 minutes.

Remove the dough from the bowl and shape it however you like. I tried a braid this time. I'm not good enough that I want to give directions on how to do it yet (for that please see your cookbook).

Cover the loaf with a damp towel or greased plastic wrap and allow it to double in size again, approximately 45 minutes. While you are waiting, preheat the oven (and baking stone, if you have one) to 450.

Just before baking, glaze the loaf with the egg wash. Put it into the hot oven. After 5 minutes, reduce the temperature to 375 and bake for another 15 minutes. Rotate the loaf and bake until the loaf is done. Total baking time may vary based on shape. My loaf took about 45 minutes.
_______________________________________________________________________________________________

Mine didn't take that long. I had to put foil on top for the last few minutes to stop it from overbrowning. It's crazy long. It'll be an adventure taking it on the 2 hour bus ride tomorrow!


I'm afraid I can't really help much with how to braid four strands of dough either, but I found a wonderful (but a bit fast to follow) video tutorial. Generally, people don't seem to mind how "perfect" the braid is - it'll look beautiful even if you make a few slip-ups. And it tastes divine!

Happy thanksgiving, Canadians!
Digg Technorati Delicious StumbleUpon Reddit BlinkList Furl Mixx Facebook Google Bookmark Yahoo

Peter Reinhart's Pizza Dough


Peter Reinhart is a well-established baking god. When he tells you how to make pizza dough, that's how you make pizza dough. Don't argue; he's right.

This pizza dough is easy-peasy to make. If you have a mixer it takes about 15 minutes. If you don't, maybe another 5. Then you stick it in the freezer, and you have delicious, thin, crispy, New York street pizza any day of the week, presuming you can remember to take it out to thaw the night before.

I make this dough about once every two months. My boy will not have any other recipe - he firmly believes in the rightness of Peter Reinhart (that's why I love him).

You can find the directions and recipe here, or you can read what I have to say down below - your choice. Same-same.

You need:
4 1/2 c flour
1 3/4 tsp salt
1 tsp yeast
1/4 c olive oil
1 3/4 c chilled water

1. Stir up your flour, salt, and yeast in the bowl you're using. I'm using my KitchenAid mixer bowl.

2. Add your oil and your water and mix.

3. Knead until the dough is soft, smooth, and pliable, or mix on low for 5-7 minutes in your mixer. The dough should clear the sides of the bowl but not the bottom.

4. Cut the dough into 6 portions. They will look small but never fear. Mine divided up into just over 7 oz each on a kitchen scale this time.

5. Shape each piece into a ball and put into an oiled ziplock baggie.

6. OK now you have a choice. You can either slip all those baggies into a big freezer bag and keep them there until you want to use them, or you can put them in the fridge overnight and use them the next day. YOU MUST REST THAT DOUGH OVERNIGHT NO IFS ANDS OR BUTS! If you keep the dough in the fridge, it'll keep that way for up to three days. In the freezer, about three months. If you put it in the freezer, take it out the night before you want to use it and put it in the fridge overnight.

7. Regardless of what you did up in step 6, your dough should now be in the fridge on the day you want to use it. Two hours before dinner/lunch/pizzatime, take out that dough and put it on the counter.

8. Roll out or press the dough into disks about 1/2" thick and 5" across. Cover them up with saran or a dish towel and leave them for two hours.

9. After an hour and a quarter, come back and preheat your oven with your baking stone (you have a baking stone, right?) to as hot as it will safely go. I go with 500F because I like it like that.

10. Pick up your dough and smile with glee as you find that it is sooo stretchy and nice to shape. Stretch it into a thin round, about 9-12" across, and lay it on a sheet of parchment paper NOT WAX PAPER because that would be gross. Also, I'm assuming you know that I mean you to do all these things with each of the dough portions. One dough portion will feed two not-very-hungry people. I'd advise one per person. They're that good, bb.

11. Be fairly sparing on your toppings. This is thin-crust, people. I go with tomato sauce, light cheese, and spinach, usually.

12. Put your little darlings into the oven and bake for 5-8 minutes. You shold watch them - they're tricksy and burn quickly. Rest them for a few minutes, then eat!


Digg Technorati Delicious StumbleUpon Reddit BlinkList Furl Mixx Facebook Google Bookmark Yahoo