Showing posts with label vegetarian. Show all posts

Tuesday, May 10, 2011

In which there is GARLIC

You know when you leave something for a while and intend to come back really soon and then it's Reading Week and you go out of town and then it's finals time and you're busy with marking and exams and then when you finally get back to it it's been four months and it's May already? Yeah. That happened to me one time, too.

ANYWAYS enough about me. Let's have some food.

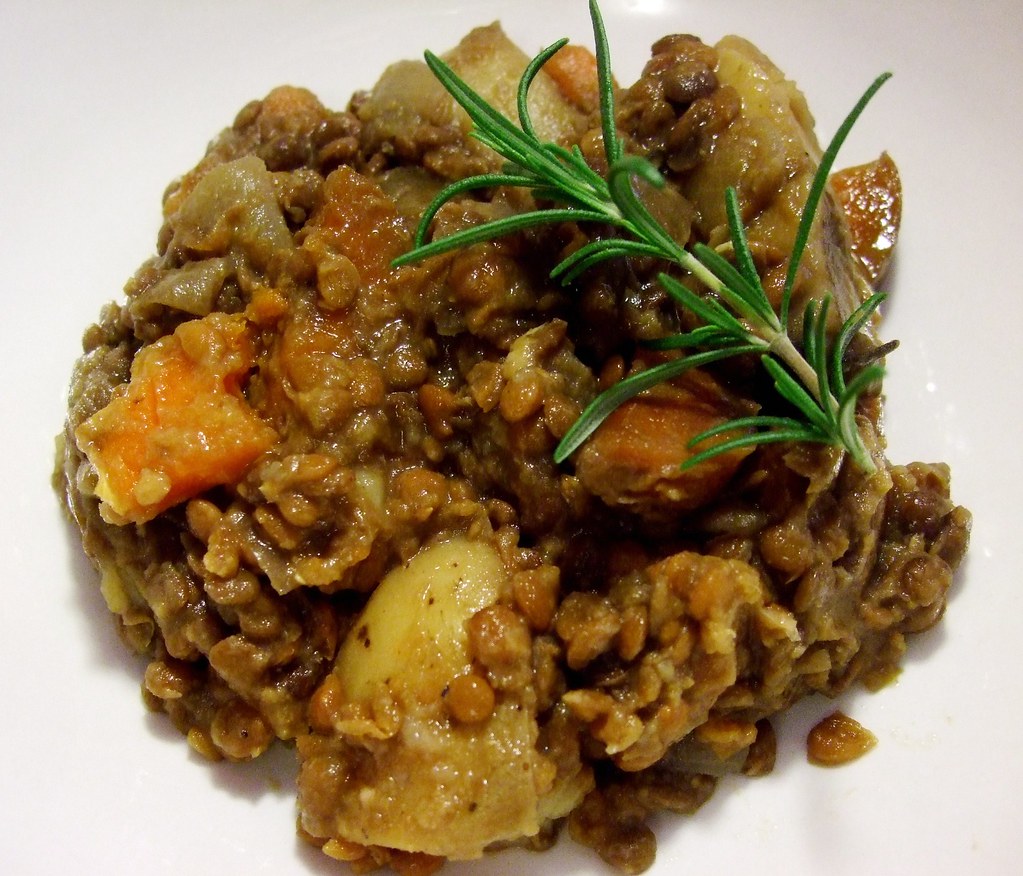
I swear one time I had this recipe for some kind of Italian bread stew but I looked for it tonight, because that's what I felt like eating, and all I could find were recipes for Italian bread SALAD or Italian bread SOUP and I didn't want either of those. So I just wung it. (Wung is the past tense of wing, in case you didn't know.) Actually, I'm kind of in the process of winging it right now, so if you ever see this, it means I was successful. If not, then I guess you're not reading this right now. Who knows, maybe after four months no one is reading it anyways!


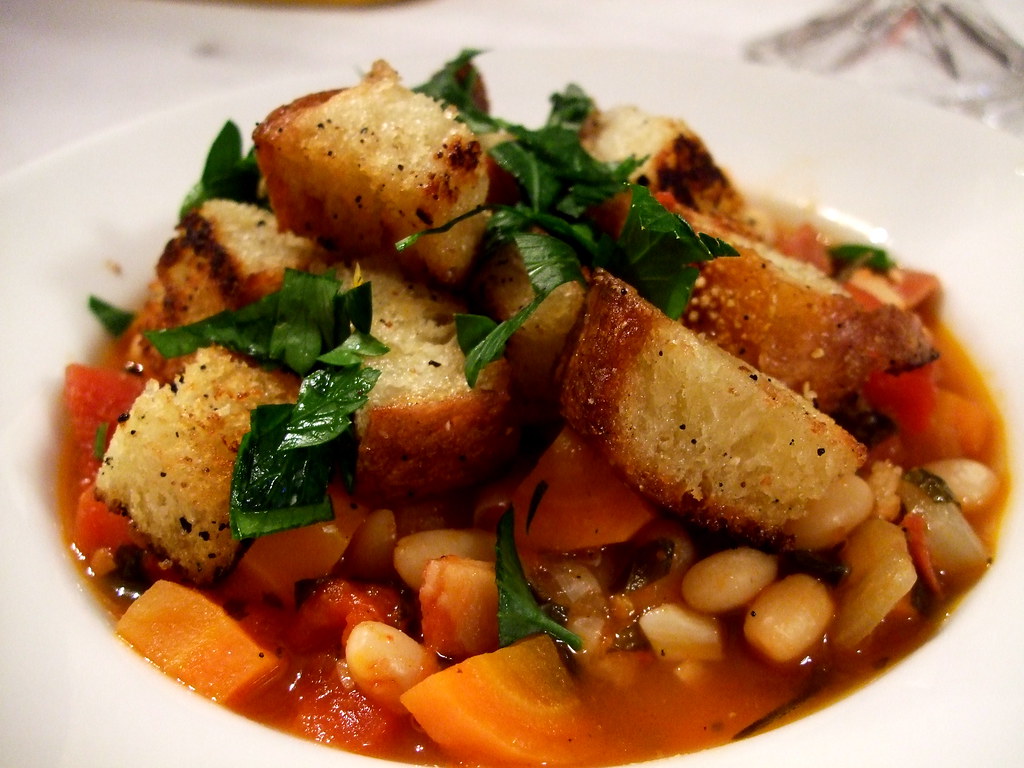
If you feel like eating my made-up recipe for Italian bread STEW, then you need the following:

3 cups of cubed stale bread
1 large tin of diced tomatoes
1.5 c cooked white beans
1 diced onion
1-5 cloves of garlic, minced (I used 5 because I'm on Team Buffy)
[Optional: some diced prosciutto, which I used because it was in my freezer and I felt like it]
1 diced carrot
two bay leaves
fresh or dried basil to taste. I added about 3 TBS fresh chopped that I had frozen from the summer!
a sprig of fresh rosemary or a bit of dried rosemary
olive oil
garlic salt (if you are so inclined)
salt and pepper
some lovely minced parsley

1. Start by heating a glug of olive oil in a deep-ish pan. Sautee your onions and your prosciutto, if you're using it. Then add the garlic and cook until it's fragrant.

2. Add the rest of the ingredients (down to where it says olive oil) and cover and cook for 10 more minutes on medium and then on low for another 30 minutes.

3. In the last 10 minutes, heat some more olive oil in another pan. Toast the breadcrumbs in the olive oil, tossing with garlic salt to taste. GARLIC! I would recommend watching the breadcrumbs closely as some of mine got a bit overly toasted and had to be eaten before their time.

4. Taste the stew for seasonings and adjust if you need to. When your breadcrumbs are all toasty and garlicky,  serve the stew in bowls and top with a heap of breadcrumbs! And parsley! You could even sprinkle some parmesan cheese on there if you were really feeling decadent!


VERDICT: DELICIOUS. Hence my posting of it here.

. Digg Technorati Delicious StumbleUpon Reddit BlinkList Furl Mixx Facebook Google Bookmark Yahoo

Monday, January 10, 2011

Cheat-Loaf


This loaf, despite being completely vegetarian, has all the familiar comforting taste of a genuine meatloaf, especially when you add the slightly sweet, rich, ketchupy glaze part way through the cooking. And, unlike a regular meatloaf, this one has NINE GRAMS of fiber per slice. NINE. So if your New Year's Resolutions involve eating healthier, this recipe is for you. (Even if you don't have New Year's Resolutions that involve food, sometimes it's a good idea to take a break from meat once in a while. It's cheaper, for one thing, and it's better for you and the environment.)

Part of the secret to how good, and how like a traditional meatloaf this one tastes is because of two secret ingredients. That's right, not one, but two secret ingredients. The first is steak sauce. The original recipe called for A-1 sauce, but we prefer HP so that's what I used, and lots of it. The second, very surprising, secret ingredient is finely chopped dates. I know. But they add a sweet, sticky texture that actually mimics meat surprisingly well. I wouldn't leave them out if I were you.

I'll warn you, though, that it's not as quick a meal to throw together as an actual meat-meat-loaf. If you add up the times on the page of the original recipe, even they have underestimated by at least 20 minutes by their own count. I would say allow 30 minutes for prep, but using the food-processor for everything will speed stuff up. I had to cook my rice as well as my lentils, so that also added time to the recipe, despite my renowned talent for multi-tasking.

I don't want to scare you off, though, because the results are amazing.

So! Now that I've rambled sufficiently, here is the recipe, which I've altered slightly from the original. It makes one large loaf, which we managed to cut into 9 slices. We ate the leftovers the next night and they were equally tasty.

You need:

A food processor (you will save yourself a lot of headache, trust me.)
1 cup dry brown lentils
2 medium carrots, grated or shredded
1 cup finely diced dates (I did mine in the food processor)
1 medium onion, diced
1 stalk celery, diced
2 tablespoons unsalted butter
2 cloves garlic, minced
1 tablespoon cumin
2 tablespoons soy sauce
3 tablespoons HP sauce
1/2 cup ground or very finely minced pecans (did 'em in the good ole food processor)
1 1/2 cups cooked brown rice
1/2 cup dry bread crumbs
3 large eggs

Sauce for Topping Loaf:
1/2 cup ketchup
1/4 cup brown sugar
2 tablespoons apple cider vinegar

First, note that you can do all your chopping in the food processor. You might as well, because you need it anyway to get the lentils the right texture, so if it's already got to be out, you may as well take advantage of it. Do the pecans first, then do the onion, celery, and carrot, and lastly the dates, because they are sticky and you  want to minimize the cleaning effort.

1. Cook your lentils in plenty of boiling water for about 20 minutes, or until they're very soft but not yet mush. Drain them really well and set aside to drain more.

2. Meanwhile, sautee the onion, carrot, celery, and dates in the butter over medium high heat for 6-8 minutes, until things are getting soft (like the onions) and there isn't a lot of liquid. You should stir a lot to make sure all the liquid gets a chance to evaporate. Add the garlic, cumin, soy sauce, and HP sauce and cook for another minute.

3. Pulse the lentils in the food processor until they're smooth. Put them in a big bowl. Pulse the cooked vegetables in the food processor until they're smooth. Add them to the lentils in the big bowl. Mix all this well and make sure it's cool enough to not cook eggs.

4. Add the rest of the ingredients for the loaf to the bowl and mix well. Make a sling with tin foil and put it in the bottom of a loaf pan. Grease the bottom and sides of the pan for easy removal. Spoon in your loaf mixture and cook for 20 minutes at 375ºF.

5. While it's cooking, add the sauce ingredients to a small saucepan and cook on low for 5 minutes, until thickened. After your loaf has cooked for its 20 minutes, take it out and slather it with the sauce. Then put the loaf back in the oven for another 20 minutes.

6. Let it cool for about 10 minutes, then slice and serve as you would normally serve meatloaf! In our house, that means with lots of ketchup.

. Digg Technorati Delicious StumbleUpon Reddit BlinkList Furl Mixx Facebook Google Bookmark Yahoo

Monday, November 29, 2010

Spinach and Pesto Pasta Bake

Sorry I don't update that often. I'm kind of hoping to make some progress on this PhD so this semester has largely seen me staying at the library until it gets really dark outside, then coming home to desperate crock-pot experiments based wishful thinking and miscellaneous pantry items. I don't deem it appropriate nor healthy to post those because then one of you poor souls might actually try to recreate it and hold me responsible.

This one is good though. I can vouch for it -- recommend it, even. It's pretty quick to make (good if you are in the throes of PhD studies), and it has spinach in it, which not only is tasty but also makes you strong. Also cheese!


(Serves 2 hungry people or 4 not very hungry people. I guess it would serve three medium-hungry people)

3 cups dry small pasta, like macaroni
1/4 c heavy cream
2 tbs flour
2 tbs basil pesto
1 garlic clove, minced
1 cup grated sharp cheese
1 medium onion in thin slices
2 cups fresh spinach, roughly chopped
2 tbs butter
1/4-1/2 c milk

1. In a cast-iron pan on medium, melt 1 tbs of the butter and saute the onions and garlic until the onions are translucent. Meanwhile, cook your pasta.

2. Turn the heat to low and add the flour to the pan and cook for a minute, then add the cream and the pesto. Stir until combined and cook for 5 minutes, until thickened.

3. Add the spinach and 1/4 c milk and cook until the spinach is wilted and everything looks nice and saucy. Season with salt and pepper.


4. Put the other tbs of butter in a small casserole dish and pour the cooked, drained pasta into it to melt the butter and coat the pasta. This not only greases the casserole, but also keeps the pasta from clumping. Then add the pasta to the pan with the spinach mixture and stir to combine. At this point, if the sauce is too thick, add the rest of the milk and adjust the salt if you need to.


5. Pour the whole shebang back into the casserole dish and top with the grated cheese. Bake in a preheated oven (375 should do it) for 10 minutes, then broil for 2 or 3 more minutes, until the cheesey top is just starting to brown. Do let it cool a bit before digging in.

Digg Technorati Delicious StumbleUpon Reddit BlinkList Furl Mixx Facebook Google Bookmark Yahoo

Sunday, October 31, 2010

Savoury French Lentil Stew

I admit that this is not the prettiest dish. It wasn't a joy to photograph, let me tell you. But what it lacked in aesthetics it more than made up for in flavour!


It's also so seriously easy to make, largely because of my little friend, the slow cooker. You could also do this in a pot and it would still be really easy and probably just as tasty, too! But these days I just have so much going on that by the time I get home around 6 the thought of *starting* dinner makes me want to eat cookies. So my slow cooker is my friend right now. What strategies do you all use to cope with busy days and hot dinners?

This dish could be vegetarian really easily; I used beef stock because it added a depth of flavour and a richness, but vegetable stock would make this a perfect, hearty vegetarian meal.


You need (Serves 4):

3 quart slow cooker
1 tbs olive oil
1 cup French/Puy lentils, rinsed and picked over*
2 large carrots, cut in coins
3 medium potatoes, in large dice
1 medium onion, diced
2 cloves of garlic, minced
1 sprig of rosemary
1 bay leaf
4 cups beef stock or veggie stock
salt and pepper to taste


To make this in the slow cooker, put all the ingredients in the slow cooker and turn to low. Cook 8-10 hours. Done!

To make this on the stove, heat the oil in a large pot and saute the onions and the garlic until translucent. Add the rest of the ingredients and simmer until the lentils are cooked and the potatoes are soft. Done!


*Because of the long cooking time, Puy or French lentils are important because they hold their shape better than regular brown lentils, but if you don't mind mush then sub other lentils if you like.

. Digg Technorati Delicious StumbleUpon Reddit BlinkList Furl Mixx Facebook Google Bookmark Yahoo

Wednesday, November 25, 2009

Spanish Tortilla


When I was in Spain this summer I ate a lot of tortillas. They were our go-to when we were sick of fish in Cabo de Palos (didn't happen to me, but to other members of my family), when we didn't feel like eating heavy meat in Madrid, or when we wanted something to nosh on between lunch and dinner while drinking a lovely Alhambra beer. And now that winter is rapidly approaching, I think about sunny Spain a lot. Like, a REAL WHOLE LOT.

While I was in Spain I bought a Spanish cookbook, but I hadn't made use of it (other than looking through it and reminiscing) until tonight. A tortilla is a perfect light dinner and it only uses pantry staples so you don't have to go out to buy anything fancy. And, if you're like me, you will get to think about lying on beautiful beaches like this one while eating it:


Here's what you need:

1 kg potatoes (about 7 small ones), thinly (THINLY) sliced (don't bother peeling them)
2 medium onions, thinly sliced
8 eggs (I made mine with 6 but 8 would have been yummier)
plenty of olive oil and salt and pepper.

1. Heat about 4-5 tbs of olive oil in a cast-iron frying pan over medium-high. When the oil is hot but not smoking (that's too hot), throw in your potatoes and brown them for 5 minutes.

2. After 5 minutes, add the onions and reduce the heat. You want to cook the potatoes through without burning them. It might take up to 30 minutes. The potatoes should be soft.

3. Meanwhile, beat your eggs with a whisk. When the potatoes are cooked, let them cook in a strainer for a while (you get rid of a bit of oil that way, too) and then mix them in with the egg. Add a fair bit of salt and pepper.

4. With the cast-iron pan still on low, pour in the egg and potato mixture. There should still be oil coating the pan from when you were cooking the potatoes. Let the tortilla cook SLOWLY. You need to cook it until egg is almost entirely cooked through without the bottom burning. DO NOT STIR THE EGGS but DO curve over the edges of the tortilla with a spatula so that the edges end up rounded.

5. When it is just about cooked through so that there are almost no runny bits on top - now this is a bit tricky - take a place and place it on top of the pan. You are going to flip that tortilla. So, holding the plate steady on the pan with one hand, flip the tortilla out of the pan and onto the plate. Then slide it carefully back into the hot pan but on the other side. Got it?

6. Let the tortilla brown on that side, then slice and serve! You can add variations - zucchini, ham, cheese - but the potato version is classic. It's pretty tasty as cold leftovers too - they serve it cold in Spain.


Digg Technorati Delicious StumbleUpon Reddit BlinkList Furl Mixx Facebook Google Bookmark Yahoo

Wednesday, September 23, 2009

Ginger Tofu Steaks

Yes that's right - tofu. Don't knock it - it's the best flavour absorber out there!

This is my friend Leila's recipe that she handed down to me years ago. It's excellent and I urge you to try it. Not only will you like it a lot, you will also feel very pleased with yourself for eating healthy and yummy things for dinner. Or lunch!

Ginger Tofu Steaks


--

You need:

2 large garlic cloves, minced
1.5" knob of ginger, minced
1/2 tsp red pepper flakes
2 tbs sesame oil
4 tbs brown sugar
3 tbs soy sauce
1 package of firm or silken extra-firm tofu

--

1. In a small bowl, mix together all the ingredients but the tofu.

2. Drain the tofu and slice into 1/2" steaks. Lay them on a rimmed baking sheet and pierce with a fork.

3. Cover with the marinade and leave until you're ready to use, refrigerated - at least 30 minutes but longer is better!

4. Grill in a grill pan or bake at 350ºF for 15 minutes, or until the edges are golden. Basting with the sauce is a good idea.

--

I served this with soba noodles and steamed broccoli and a bit of soy sauce and mirin mixed together for extra sauciness.

Digg Technorati Delicious StumbleUpon Reddit BlinkList Furl Mixx Facebook Google Bookmark Yahoo

Monday, September 14, 2009

Dosas with Chickpea Filling and Coconut Sauce


This recipe was my first assignment in the Daring Cook's Challenge. Every month, a challenge is assigned and cooks and food bloggers all try their hands at what might be something completely new and unfamiliar.

This month, the challenge, assigned by Debyi of The Healthy Vegan Kitchen, was a wonderful vegan Indian dish composed of spelt flour pancakes (dosas), a chickpea curry, and a coconut and tomato sauce to finish. I admit that I grumbled about having to go out and buy soy milk, but the meal was delicious and will definitely become one of my go-to special dinners.


The amounts here will feed at least five hungry people (we were only three and have enough left over for lunch and dinner for two!), but the chickpea filling freezes well and the dosas are actually quite easy to make, so a little extra wouldn't go amiss.

First, for the Chickpea Filling, you need:

5 cloves garlic, crushed and minced.
1 medium onion, peeled and finely diced
1 largish carrot, peeled and finely diced
1 green pepper, finely diced (red, yellow or orange are fine too)
2 medium hot banana chilies, minced (I couldn't find any hot peppers so I omitted them. Still yum.)
2 TBSP ground cumin
1 TBSP dried oregano
1 TBSP coarse sea salt (remember that if you use fine, you should use less!)
1 TBSP turmeric
4 cups cooked or canned chick peas (about 2 cans)
½ cup (one small can) tomato paste


1.Heat 1 TBS canola oil in a large saucepan over medium to low heat. Saute the onion and the spices with the carrot until the onions are softened. Then add the garlic and peppers and continue to cook until soft, stirring occasionally.

2.Mash the chickpeas by hand, with a hand blender like I did, or in a food processor. They don't have to be completely mashed - I left a bunch (maybe a third) whole to make a better texture.

Add the chickpeas and tomato paste to the saucepan, stirring until heated through. At this point mine was a bit dry, so I added about 3/4 c water - you may wish to do this also.


Second, make your coconut sauce:

1 onion, peeled and finely diced
2 cloves garlic, smashed and minced
½ ground cumin
¾ tsp coarse sea salt
3 TBSP curry powder (mild or hot - whatever you like!)
3 TBSP spelt flour (you can use whole wheat flour if you can't find spelt)
3 cups vegetable broth (you can use chicken if you don't mind it no longer being vegan!)
2 cups coconut milk
3 large tomatoes, diced

1. Heat a little oil in a large saucepan over medium heat. Add the onion and garlic, cooking for 5 minutes, or until soft.

2. Add the spices, cooking for 1 minute more. Add the flour and cook for 1 additional minute.

3. Gradually stir in the vegetable broth to prevent lumps. Once the flour has been incorporated, add the coconut milk and tomatoes, stirring occasionally.

4. Let it simmer for half an hour.


At this point, you are ready to start your pancakes. For the Dosas, you need:

1 cup spelt flour (or whole wheat, or gluten free)
½ tsp regular salt
½ tsp baking powder
½ tsp curry powder
½ cup soy milk (or almond, or rice, etc.)
¾ cup water
cooking spray, if needed (I needed.)

1. Combine the dry ingredients in a bowl. Slowly add the soy milk and water, whisking until smooth.

2.Heat a nonstick skillet over medium heat. Spray your pan with a thin layer of cooking spray, if needed. It's important that the pan is hot enough - you will end up with sad pancakes if your pan is not hot. We had a few sad pancakes, but they were eaten anyways, so I guess they weren't that sad! :)


3.Ladle 2 tablespoons of batter into the center of your pan in a circular motion until it is a thin, round pancake. (If you have made crepes before, it is the same technique.) When bubbles appear on the surface and it no longer looks wet, flip it over and cook for a few seconds. Remove from heat and repeat with remaining batter. Makes 8 pancakes. (We ended up with about 12 pancakes, but they were on the smaller side.)


I arranged the pancakes on a plate and served the chickpeas and the coconut sauce separately so that people could assemble their own. The basic idea is that the chickpea filling goes inside the dosa like a burrito, and then the sauce either can go on top, enchilada style, or inside before you wrap it up. You could even dip, I suppose. Either way, this was a popular dinner in my house and I am very excited to have expanded my cooking skills! Look for another Daring Cook post next month at this time!

Digg Technorati Delicious StumbleUpon Reddit BlinkList Furl Mixx Facebook Google Bookmark Yahoo

Wednesday, September 9, 2009

Back!

Hello, dear readers!

I have returned from my travels and I have a recipe for you. I have a food-review to post shortly about all the delicious (and sometimes surprising) things I ate, but I'm still working on it.

For now, inspired by the Spanish tortillas I ate while in Spain, I have concocted a lunch or breakfast recipe that makes packing a lunch or grabbing something to eat in the morning pretty easy. You could easily make amendments to this recipe to include other types of cheese, sliced ham, red peppers, etc, or the traditional potato found in Spanish tortillas, so if you have success with variations, let me know! :)

Mini Tortillas con Queso (and Spinach) (Makes 12)


You need:

6 eggs
3 tbs chopped chives (or green onions)
1.5 c chopped baby spinach (or arugula)
3 oz sharp cheese, like cheddar, parmesan, or gruyere, grated.
2/3 c dairy - i used 10% cream but you could use milk or yogurt or something else.
a 12-cup muffin tin
cooking spray

1. Preheat your oven to 400ºF and spray the muffin tin with cooking spray, or grease it with butter. You could put muffin liners in, but I don't know how well the egg would come off the paper.

2. With a whisk or a hand mixer, beat the eggs with the milk/cream until foamy.

3. Stir in the chives and spinach.

4. Using a 1/4c measuring cup, fill each muffin cup with the egg mixture.

5. Divide grated cheese among the cups and bake 15-20 minutes, until puffy and golden brown on top.


Mine deflated a lot after I took them out of the oven, but they're still really tasty!

These tortillas freeze really well, too. I just packed all of mine up in individual ziplocks and put them all in a big freezer bag. Just pop it in the toaster oven to warm it up the morning of, or at work/school if you have access a toaster oven. I imagine the microwave would work out OK too, but they might get a bit rubbery.

Digg Technorati Delicious StumbleUpon Reddit BlinkList Furl Mixx Facebook Google Bookmark Yahoo

Tuesday, June 2, 2009

Chickpea Curry with Star Anise

In my Christmas stocking this past December, Santa gave me a jar of Bruno's Favourite Curry Powder. It's from a small store called Bruno's Best in Vancouver (Santa always knows the best places to shop). Tonight I used it to make a variation on one of my standard, go-to meals, curry. The addition of whole star anise and cinnamon during the simmering of this curry add a real depth of flavour - not to mention, star anise is really one of the prettier spices!


You need:

3 whole star anise (mine were a gift from a friend who visted Malaysia but you should be able to get them at a normal grocery store)
1 large cinnamon stick
2-3 tbs curry powder (I used Bruno's favourite, of course)
1 tbs cumin, dried
1 big can diced tomatoes with juice
1 c chicken or veggie stock
2 c cooked chickpeas
1 diced red bell pepper
5 cloves minced garlic
2 diced medium onions
2 tbs apple or mango chutney

1. Heat up 2 tbs of canola oil in a big pan over medium heat. This is the one I use. I love it. When the oil is hot, add your onions and saute until they're translucent.

2. Add the ground spices, garlic, and red pepper and saute for a few minutes, until the spices are fragrant and the garlic starts to cook.

3. Add the tomatoes, stock, chickpeas, chutney, and the star anise and cinnamon. Let this simmer for about 20 minutes. It will reduce and the flavours of the cinnamon and star anise will slowly meld into the gravy, adding a nice depth to the curry.

4. Serve with jasmine or basmati rice, and perhaps some naan bread.

Digg Technorati Delicious StumbleUpon Reddit BlinkList Furl Mixx Facebook Google Bookmark Yahoo

Wednesday, May 27, 2009

Risotto

Making risotto is time consuming. It is time consuming in a way that chains you to the stove. That, in fact, is part of what makes it so special, and so rewarding. I don't mind at all being chained to the stove while cooking risotto, because the aromas wafting up from the simmering pot are almost as good as eating the dish itself: sizzling shallots, butter, gently simmering white wine... I never turn the vent fan on when I'm cooking this dish.


A basic risotto is very simple. Once the basic concept and pattern is established, it's pretty easy to shake things up a bit. You can vary the ingredients to make it more complicated, adding meat, seafood, various vegetables, or mushrooms, or by changing the type of broth or wine used to cook the rice. This here is a pretty basic recipe.

You need:

1.5 c Arborio rice
1.5 c white wine
2 c chicken or veggie stock
1/2 c finely chopped shallots (you can use onions if you must)
3 tablespoons of butter
1 c frozen peas
1/2 c grated Parmesan cheese

Note: you can use medium or short grain rice if you have to, but the Italian Arborio rice really works the best. Also, pick a white wine that you would drink. This is the general rule for cooking with wine. Plus, then you can drink some as you go! :)

What you do:

1. Melt 2 tbs of the butter over medium-low heat in a large saucepan and add the shallots. Cook for about 2 minutes, until they start to get soft. Add the rice and cook for about 3 more minutes, until the rice turns translucent around the edges.

2. Add 1/2 c of the wine and stir constantly (you will hear this a lot) until the liquid is all but absorbed.

3. Add the stock 1/2 c at a time, stirring constantly to absorb all the liquid before adding the next 1/2 c. This will take about 15 minutes.

4. If the stock is gone and your rice is still raw, it's time to add more wine. You should, of course, pour a glass for yourself! Just to make sure it's ok, you understand. Add as much wine as you need, 1/2 cup at a time, as above, until the rice is cooked through but still has a "bite" to it. It is important to add it very slowly because otherwise you might get rice soup and that is no fun.

5. After the stock is gone, add in your cup of peas. They will cook quickly in the wine and rice. When the rice is *almost* cooked and your liquid is almost absorbed, stir in the parmesan cheese and the last tbs of butter.

6. Serve in bowls. I topped mine with a handful of baby spinach leaves and arugula, which added a nice bite to contrast with the sweet peas and the tangy rice. Enjoy, obviously with a glass of wine.


Digg Technorati Delicious StumbleUpon Reddit BlinkList Furl Mixx Facebook Google Bookmark Yahoo

Wednesday, May 20, 2009

White Bean Dip: Both Amazing and Easy

I can't stop eating this dip. I'm already plotting to make more. It's creamy and flavourful and garlicky without being overpowering. It's also low-fat and low-carb, if you care about such things. It's very high-yum and high-protein and high-ly likely to be devoured before I can finish writing this post.


You need:

1.5 cups cooked white beans, like navy beans*
1 head of garlic
4 tbs olive oil
1/2 tsp coarse sea salt
1/4 cup finely diced red onion
2-3 tsps lemon juice

* Look, it's really really easy to cook your own dried beans from scratch and it's quite a bit cheaper. It takes about 4 hours and you don't have to stand there the whole time. Make a bunch and freeze them in baggies. If you don't believe there's a difference, take my word for it. If you always hated beans, try making your own. They are amazing. Cans are for jerks. <--- Please note, this is a rant. Do not take it too seriously. A bit seriously, but not too seriously.

1. Roast your garlic. Preheat your oven to 400ºF and slice off the very top of your head of garlic. Do not separate the individual cloves! Leave it whole! Place the whole head in a piece of aluminium foil and drizzle with 1 tbs of olive oil and a pinch of the sea salt. Wrap up the garlic head in the foil and put it in the oven for 30-35 minutes.

2. Put the rest of the ingredients in a food processor. When the garlic is done, let it cool, then squish all (yes all) the cloves out of their skins by squishing the head of garlic from the bottom. Add the garlic to the food processor, too. Mmm garlic.

3. Process/blend the dip until it's creamy. You may need to adjust the lemon juice or salt to your taste - this is just my taste. Serve with toasted pita or veggie dippers!

Digg Technorati Delicious StumbleUpon Reddit BlinkList Furl Mixx Facebook Google Bookmark Yahoo

Monday, April 27, 2009

Spaghetti Aglio E Olio

E red peppers e chives...


If you plan on kissing, make sure your kiss-ee eats this too. It's for garlic lovers!

You need (serves 2):

1/8 tsp red paper flakes
8 cloves of garlic, thinly sliced
4 tbs olive oil
spaghetti for 2
2 tbs minced chives or 2 tbs chopped fresh flat-leaf parsley
1/3 of a red pepper that needed to get used up (optional but yummy)

1. Heat the oil on very low in a large cast-iron skillet (big enough to toss the pasta in later). Add the garlic and let it cook.

2. Meanwhile boil your water with lots of salt. When it's boiling, add your pasta.

3. Pour yourself a glass of wine and chop up your chives and/or parsley and/or peppers.

4. Wait for the garlic to get a bit brown on the edges. Hopefully this will correspond with your pasta being almost done. At this point, toss in your peppers and parsley/parsley substitute and the red pepper flakes.


5. When your pasta is done to your liking, drain it and toss with the oil etc. Add salt and pepper to taste and enjoy!

Digg Technorati Delicious StumbleUpon Reddit BlinkList Furl Mixx Facebook Google Bookmark Yahoo

Sunday, April 26, 2009

Roasted Asparagus with Poached Eggs

My memories of poached eggs are from when I was little and hated egg whites. I only liked the yolk, and I liked it runny. Perfection for me as a five year old was a mug full of cut up, buttered toast and a runny poached egg.

I am still convinced that the perfect proportion of yolk to white lies in the poached egg, where the distribution of the white is such that it minimizes its interference with the golden, buttery yolk. Many days I eat poached eggs on toast for breakfast, but sometimes I want something a little more mature, a little more sophisticated. Enter this meal:


You need:

1 bunch of asparagus (yay! It's asparagus season!)
2 tbs olive oil
2 tbs parmesan cheese (optional but delicious)
2 eggs

1. Heat your oven to 400ºF with the rack in the middle. Line a baking pan with foil to make clean-up easy. Trim your asparagus by bending each spear until it snaps - that way you don't get any woody bits.

2. Put your asparagus in the baking pan and drizzle with the olive oil, tossing to coat. Sprinkle the cheese on top, if you're using it. If you're not, I'd sprinkle a bit of coarse sea salt on top.


3. Put the pan in the oven. Start a small pot of water on to boil. Poaching eggs works best if you have the water deep enough that the egg doesn't just sit on the bottom. The pot should be wide enough that you can swirl the water and eggs around with a bit of room to spare.

4. After about 12 minutes, the asparagus will be done. So before that point, after about 7 minutes and when your water is boiling, turn the pot down to medium high, swirl the water with a spoon so that it swirls in a circle, and break your eggs into this swirling, boiling water. The swirling makes sure that the whites wrap around the yolk, giving it that perfect ratio we discussed earlier.

5. Check on your asparagus. It may be done, and by done I mean roasty-toasty. You can take them out when they look fully cooked and the cheese is golden. At this point, check your eggs. I am never sure how long it takes for a poached egg to cook. I hover over the stove and lift it out after the white becomes opaque to poke it and see how it's doing. When the white is firm but before the yolk hardens, I pull it out. Remember that the egg will keep cooking for a bit after it's out of the water, so don't wait too long!

6. Arrange your asparagus on a plate and top with the eggs. Generously salt and pepper your plate and dig in! You might want to have a piece of toast standing by to mop up all that delicious yolk.


I had this for lunch, but I think it would be lovely for a quiet dinner on a weeknight, or in a smaller portion, it would work really well as a starter if you were having a fancy dinner party.

Digg Technorati Delicious StumbleUpon Reddit BlinkList Furl Mixx Facebook Google Bookmark Yahoo

Sunday, April 19, 2009

Penne with Rosemary

I wish this picture could express the amazing things that the rosemary did for the taste. This sauce had a really unexpected depth of flavour. It was rich and flavourful without being heavy - perfect for the oncoming spring. And because you add flour and milk at the last moment, the sauce coats each piece of pasta, so you can stretch a small amount of sauce (with a big taste) over a large amount of pasta. It's also an excellent pantry-dinner; I had all the things required already in the house (with some minor subs)!


I got the recipe from the Serious Eats column "Dinner Tonight", which is an excellent resource when you don't know what to make for dinner. Here's their recipe:

Spaghetti with Rosemary

- makes 4 servings -

Ingredients

2 tablespoons olive oil
2 tablespoons fresh rosemary leaves, minced (I used 1 tbs dried)
1 garlic clove, chopped
1/2 red chile, chopped (I used about 1/4 tsp dried chili flakes)
9 ounces canned tomatoes with juice, chopped
1 tablespoon flour
1 tablespoon milk
1 tablespoon water
12 ounces spaghetti (I used penne - no spaghetti in the house!)
Parmesan
Salt

Procedure

1. Pour the oil in a skillet and turn the heat to medium. Toss in the rosemary, garlic, and chile. Cook until fragrant, about two minutes. Pour in the chopped tomatoes. Bring to a boil, then reduce to a simmer, and cook for 30 minutes.

2. In a small bowl, whisk together the flour, water, and milk.

3. Bring a large pot of water to a boil for the spaghetti. Cook according to directions on the box.

4. When done simmering, season with the tomato sauce with salt, and then pour in the flour mixture. Mix together and then cook for 5 minutes.

5. Toss the drained spaghetti in with the rosemary sauce to coat. Serve with some grated parmesan.

Digg Technorati Delicious StumbleUpon Reddit BlinkList Furl Mixx Facebook Google Bookmark Yahoo

Tuesday, March 31, 2009

Veggie Lasagne

Warmer weather means that I have fewer hankerings for large pieces of meat and long-braised stews. But I'll always love cheese.


You need:

1 tin tomatoes, diced or crushed (depending on how chunky you want your sauce)
1 medium onion, finely diced
3 cloves of garlic, minced
1/2 c red wine (optional)
1/2 c stock of some sort... i used chicken
1 tbs olive oil
1 or 2 bay leaves
1 or two carrots, grated
1/2 a red or yellow pepper, thinly sliced into 2" pieces
1 smallish zucchini/courgette, thinly sliced
2 handfuls spinach or 1/2 pack frozen spinach, diced
2 handfuls fresh arugula (optional)
some lasagna noodles (i used oven-ready ones; if you aren't you'll have to boil them first)
250 ml cottage cheese (it is tradition in my family to use cottage cheese. please don't kill me!)
250 g grated mozzarella
4 tbs parmesan cheese

1. Saute the onion and garlic in the olive oil over medium heat.

2. Add the tomatoes, carrot, spinach, stock, and wine, if using. if you're not using the wine, add a bit more stock. I like to add grated carrot to the sauce because the sweetness of the carrot takes the edge off the acidity of the tomatoes, and you don't have to resort to sugar, as some do. The sauce will be delicious on its own, and if you chicken out at this point, you can always eat it over other pasta. It's a good default sauce.

3. Simmer until reduced a bit; I used this time to chop my other veggies.

4. In a casserole dish, layer sauce, then noodles, then cheese (some cottage, some mozza), then zucchini; then sauce, then noodles, then cheese, then peppers and arugula, if using; then sauce, then noodles, then sauce, then the rest of the mozza and all the parmesan.


5. Cover with a lid or tinfoil and bake in a 375ºF oven for 30-40 minutes; then uncover and bake another 15 minutes, until the cheese is toasty on top.

There is no "served" photo because I actually think it's impossible to make a lasagne stand up properly as they do on the box of noodles. :) But it was delicious and you'd never know there was no meat. :)

Digg Technorati Delicious StumbleUpon Reddit BlinkList Furl Mixx Facebook Google Bookmark Yahoo

Sunday, March 29, 2009

Spaghetti Primavera

This is such an easy and healthy dinner.


That is, until I smothered it with parmesan cheese!

You need:

Enough pasta for 4 people (or two people, or one person etc. My amounts are for 4 because we like leftovers.)
Red bell pepper, quartered and thinly sliced
Zucchini, halved lengthwise and thinly sliced
3 cloves of garlic, minced
Half a red onion, quartered, then thinly sliced
1 cup arugula or baby spinach
3 tbs olive oil
salt and pepper

1. Put on a big pot of water and while you're waiting for it to boil, chop up your veggies.

2. Saute your onion and garlic in 1 tbs of the oil in a pan.

3. When water is boiling, put your pasta in that pot, and at the same time, put the red pepper and zucchini in with the onions and garlic.

4. When the pasta is cooked, drain it, then put it back in the pot with the other 2 tbs of olive oil. Add your veggies on top, and the arugula. Season to taste and toss to coat the pasta in the "sauce".

5. Drench in parmesan cheese, and eat up!

I served this with homemade bread and a caesar salad with pancetta. (The pancetta is really easy - all you do is separate out your pancetta slices and arrange them on a paper towel on a plate. Put it in the microwave for about 2 minutes. That pancetta will crisp up like nobody's business and you can put it on anything! Pasta, salads, in sandwiches...! YUM!)

Digg Technorati Delicious StumbleUpon Reddit BlinkList Furl Mixx Facebook Google Bookmark Yahoo