Showing posts with label herbs. Show all posts

Monday, November 29, 2010

Spinach and Pesto Pasta Bake

Sorry I don't update that often. I'm kind of hoping to make some progress on this PhD so this semester has largely seen me staying at the library until it gets really dark outside, then coming home to desperate crock-pot experiments based wishful thinking and miscellaneous pantry items. I don't deem it appropriate nor healthy to post those because then one of you poor souls might actually try to recreate it and hold me responsible.

This one is good though. I can vouch for it -- recommend it, even. It's pretty quick to make (good if you are in the throes of PhD studies), and it has spinach in it, which not only is tasty but also makes you strong. Also cheese!


(Serves 2 hungry people or 4 not very hungry people. I guess it would serve three medium-hungry people)

3 cups dry small pasta, like macaroni
1/4 c heavy cream
2 tbs flour
2 tbs basil pesto
1 garlic clove, minced
1 cup grated sharp cheese
1 medium onion in thin slices
2 cups fresh spinach, roughly chopped
2 tbs butter
1/4-1/2 c milk

1. In a cast-iron pan on medium, melt 1 tbs of the butter and saute the onions and garlic until the onions are translucent. Meanwhile, cook your pasta.

2. Turn the heat to low and add the flour to the pan and cook for a minute, then add the cream and the pesto. Stir until combined and cook for 5 minutes, until thickened.

3. Add the spinach and 1/4 c milk and cook until the spinach is wilted and everything looks nice and saucy. Season with salt and pepper.


4. Put the other tbs of butter in a small casserole dish and pour the cooked, drained pasta into it to melt the butter and coat the pasta. This not only greases the casserole, but also keeps the pasta from clumping. Then add the pasta to the pan with the spinach mixture and stir to combine. At this point, if the sauce is too thick, add the rest of the milk and adjust the salt if you need to.


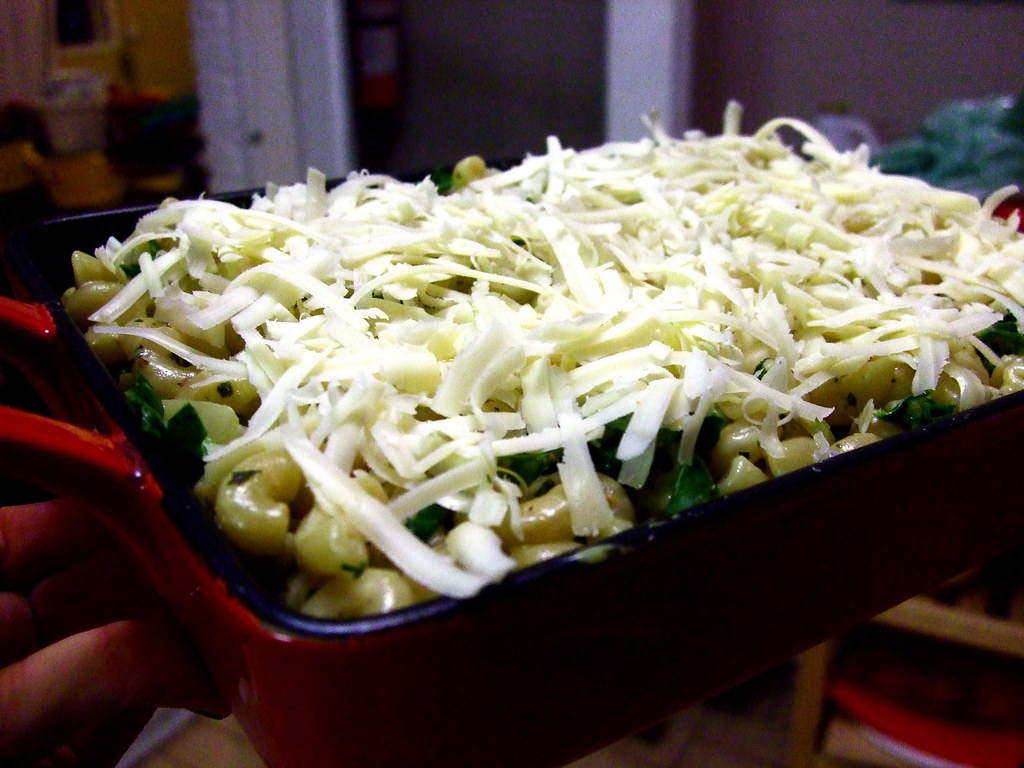
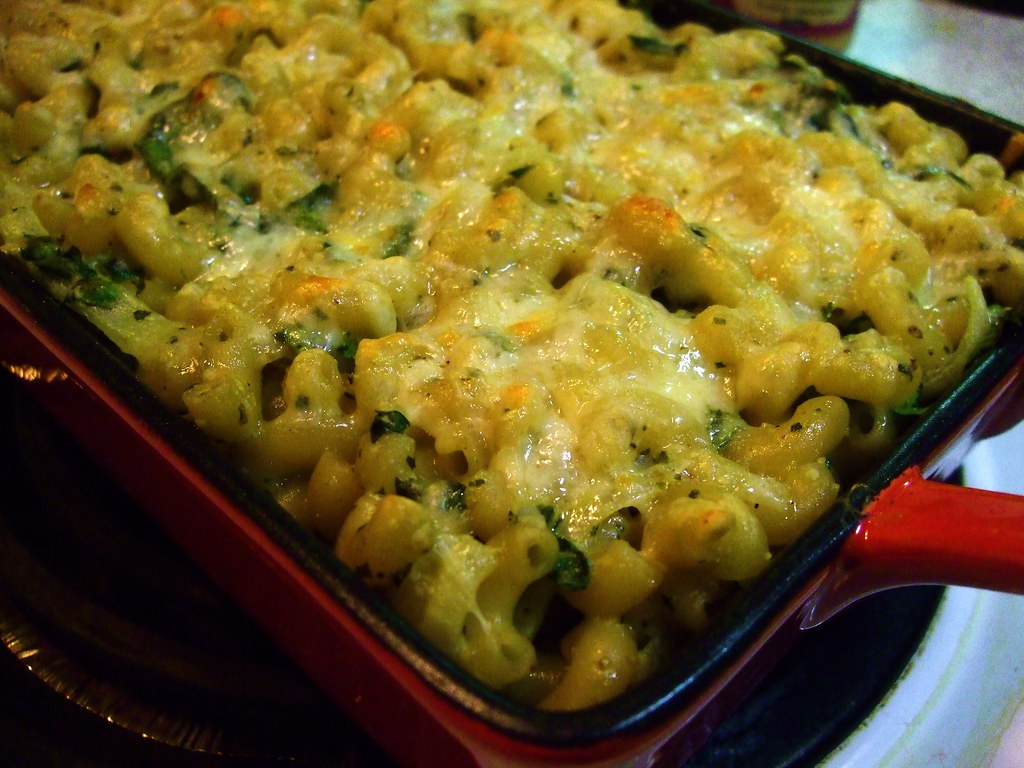
5. Pour the whole shebang back into the casserole dish and top with the grated cheese. Bake in a preheated oven (375 should do it) for 10 minutes, then broil for 2 or 3 more minutes, until the cheesey top is just starting to brown. Do let it cool a bit before digging in.

Digg Technorati Delicious StumbleUpon Reddit BlinkList Furl Mixx Facebook Google Bookmark Yahoo

Wednesday, September 9, 2009

Back!

Hello, dear readers!

I have returned from my travels and I have a recipe for you. I have a food-review to post shortly about all the delicious (and sometimes surprising) things I ate, but I'm still working on it.

For now, inspired by the Spanish tortillas I ate while in Spain, I have concocted a lunch or breakfast recipe that makes packing a lunch or grabbing something to eat in the morning pretty easy. You could easily make amendments to this recipe to include other types of cheese, sliced ham, red peppers, etc, or the traditional potato found in Spanish tortillas, so if you have success with variations, let me know! :)

Mini Tortillas con Queso (and Spinach) (Makes 12)


You need:

6 eggs
3 tbs chopped chives (or green onions)
1.5 c chopped baby spinach (or arugula)
3 oz sharp cheese, like cheddar, parmesan, or gruyere, grated.
2/3 c dairy - i used 10% cream but you could use milk or yogurt or something else.
a 12-cup muffin tin
cooking spray

1. Preheat your oven to 400ºF and spray the muffin tin with cooking spray, or grease it with butter. You could put muffin liners in, but I don't know how well the egg would come off the paper.

2. With a whisk or a hand mixer, beat the eggs with the milk/cream until foamy.

3. Stir in the chives and spinach.

4. Using a 1/4c measuring cup, fill each muffin cup with the egg mixture.

5. Divide grated cheese among the cups and bake 15-20 minutes, until puffy and golden brown on top.


Mine deflated a lot after I took them out of the oven, but they're still really tasty!

These tortillas freeze really well, too. I just packed all of mine up in individual ziplocks and put them all in a big freezer bag. Just pop it in the toaster oven to warm it up the morning of, or at work/school if you have access a toaster oven. I imagine the microwave would work out OK too, but they might get a bit rubbery.

Digg Technorati Delicious StumbleUpon Reddit BlinkList Furl Mixx Facebook Google Bookmark Yahoo

Friday, May 8, 2009

Herb-crusted White Fish


This is sort of the antidote to the last post: fresh, healthy, and bursting with flavour. It was a bit labour intensive, since Quebec apparently does not believe in the selling of anchovy paste, and sells only the whole fillets - I ended up having to make my own.

The recipe is, once again, from Serious Eats' column, Dinner Tonight. It calls for three different fresh herbs, lovely red onions, and salty, tasty anchovies. All together, the taste is rich without being heavy, and the combination of fresh herbs brightens the flavour of the fish rather than overpowering it. I almost left out the mint because I'm not usually a big fan, but I'm really glad I kept it in. It really made the dish.

The only thing I changed from the recipe was the type of fish. Atlantic Cod stocks are very low. If you can, you should choose a more sustainable firm, white fish for this recipe. Here's a guide.

Here's the recipe, copied from Dinner Tonight:

1 medium or 1/2 of a large red onion
2 tablespoons olive oil
1 tablespoon red wine vinegar
12 to 16 ounces firm white fish fillet, cut in 3 to 4-ounce portions
1/2 teaspoon anchovy paste*
3 tablespoons dried breadcrumbs
3 or 4 sprigs fresh, flat-leaf parsley
8 to 10 fresh mint leaves
3 or 4 large fresh basil leaves
Salt and freshly ground pepper to taste
1/2 cup dry white wine or water
10 to 12 oil-cured black olives, cracked and pitted


*If you want to make your own anchovy paste, blend a tin of anchovies with 2 cloves of garlic, 1 tbs of wine vinegar and some of the oil from the can in a food processor until it is a paste. Easy.


Procedure

1. Preheat the oven to 400°F.

2. Cut the onion into quarters, then cut the quarters crosswise and separate the layers to create wide, square slices. In a sauté pan, heat 1 tablespoon of olive and add the onion. Season with salt and pepper, and sauté over low heat until the onion has wilted and started to turn translucent; be careful not to let it brown. Add the red wine vinegar to the pan and shake it briefly, then transfer everything to the bottom of a medium-sized baking dish.

3. Wipe the pan with a paper towel to clean it, then place it back over low heat and add the remaining tablespoon of olive oil. Add the anchovy paste and stir with a wooden spoon to dissolve the paste into the oil. Dump the breadcrumbs into the pan and stir to completely coat them with the oil. Transfer the breadcrumbs to a small bowl to cool slightly.

4. Wash the herbs, pat them dry, and finely chop them. Add them to the bowl with breadcrumbs, and season everything with a small pinch of salt and a few grinds of black pepper.

5. Lay the portioned fish on top of the onions and season with a bit more salt and pepper. Distribute the breadcrumb-herb mixture evenly on top of the fish. Add the white wine or water to the pan and scatter the olives around the dish.

6. Bake the fish for 15 to 20 minutes, depending on the thickness of the fish; it should be cooked through but still moist; check the pan after 10 minutes and add a bit more water or wine if necessary.

7. Serve immediately, with the some of the onions, olives and pan juices spooned alongside the fish.


Digg Technorati Delicious StumbleUpon Reddit BlinkList Furl Mixx Facebook Google Bookmark Yahoo

Monday, April 6, 2009

"Bistro Chicken"

If you love crispy, juicy, herbed chicken with the skin on, you need to try this. It's delicious in the oven, but even better in the summer on the barbecue.


You need:

8-10 skin-on chicken drumsticks and/or thighs
1 tsp coarse sea salt
1 tbs dried or 2 tbs fresh rosemary, crushed
2 tsps dried thyme
1 tsp fresh ground black pepper
2 tbs olive oil
zest of one lemon (optional)

Preheat your oven to 400ºF and line a baking sheet with foil, if you're doing this in the oven. Otherwise, heat up your grill.

Mix all the non-chicken ingredients in a small bowl.

With your fingers, carefully separate the skin from the meat on a piece of the chicken. Stuff the space under the skin with a small amount of the herb paste. Repeat with the other chicken pieces. You may need more paste than I gave amounts for - I really just eyeball it and make more if I need it. The olive oil makes the meat super juicy and the herbs permeate throughout.

Arrange the chicken on the barbecue or on your baking sheet and bake/grill until the chicken is cooked through and the skin is crispy and golden.

This goes well with mashed potatoes and veg in the winter, and with grilled corn on the cob and potato salad in the summer. So easy and versatile, and your dinner guests will think you are made of magic.

Digg Technorati Delicious StumbleUpon Reddit BlinkList Furl Mixx Facebook Google Bookmark Yahoo